Plant Search By Name
Abelia
Abelia Care
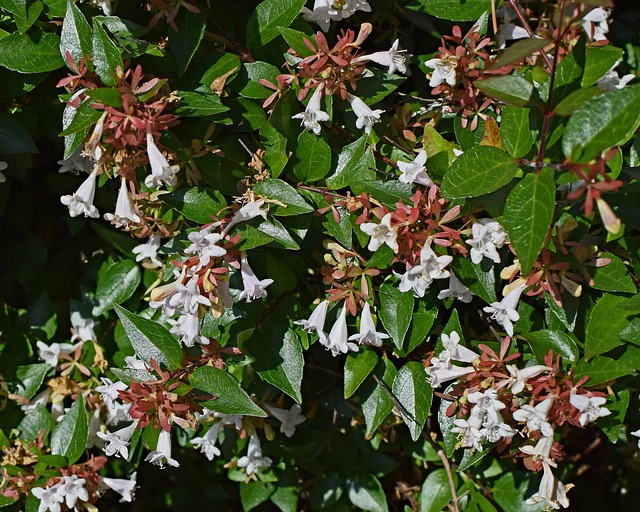
Known for its vibrant foliage and long bloom times, the Abelia genus consists of about 30 species of both deciduous and evergreen shrubs. There has been much discussion about the Abelia genus itself, since modern DNA testing has proved that some previously recognized members of the genus were substantially different.Various horticultural experts recognize different nomenclature structures, either reducing the size of the Abelia genus or reclassifying these species as members of the Linnea genus.
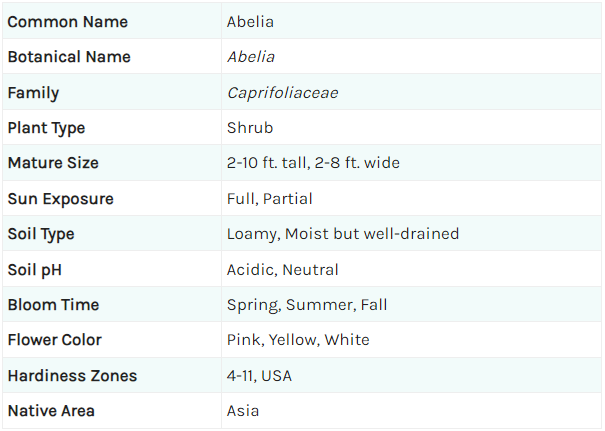
For shrubs commonly known as abelia, there are several common identifiers. These shrubs produce pointed, oval-shaped leaves that are often yellow or green with pink, orange, bronze, or burgundy details. Some are multi-colored or variegated and even change color as the seasons change. Their flowers are tubular and are often seen in white, pink, or yellow. Unlike many flowering plants, abelia shrubs have a long blooming season that extends from spring until fall.
Light
Abelia can be grown in both full sun and partial shade. However, planting them in an area with full sun will encourage more vibrant foliage colors and a healthy bloom. Plants grown in areas with intense summer heat will benefit from some afternoon shade.
Soil
Although abelia plants thrive in fertile, well-draining, and moist soil, they are tolerant of different soil conditions. Amending the soil with compost before planting is recommended, as these plants do best in soil that is rich in organic matter. Soil pH levels should be slightly acidic for optimal growth.
Water
These low-maintenance plants are drought tolerant once established. However, they do best when provided with regular watering. Especially during the hotter summer months, you should plan to water abelias once or twice a week to keep them vibrant and healthy. Allow the soil to begin drying before watering again. Watering deeply and infrequently is better for abelias than watering lightly and regularly.
Temperature and Humidity
Abelia plants can be grown in a wide range of climates, from USDA hardiness zones 4 to 11. The preferred growing zones depend on the specific needs of each variety.
Fertilizer
Abelia shrubs benefit from soil that is rich in organic matter. Add compost yearly to provide needed nutrients and to support proper soil drainage. Additionally, providing the plant with a slow-release shrub fertilizer in the early spring will give abelias the boost they need for another year of growth.
Pruning
Occasional pruning will help keep abelia shrubs looking clean and growing strong. It is best to prune in late winter or early spring to avoid pruning off new growth or flower buds. Remove any damaged or dead branches and prune the plant to your desired shape. Take no more than about one-third of the shrub. Certain varieties produce long, thin shoots from the trunk or branches that can be removed for a cleaner appearance. Other varieties bloom on old wood, making it best to prune after flowering.
Propagating Abelia
Propagating abelia can be done through cuttings, both hardwood and softwood. Though hardwood cuttings are often hardier than softwood, they do not root as easily as softwood cuttings. Softwood cuttings are taken in the spring while hardwood cuttings are taken in the fall. Both are cared for in the same way. To grow either option, you will need sharp snips, a small pot, well-draining, rich soil, and rooting hormone. Then follow these steps:
1. Using sharp snips, cut a small branch that is around 6 inches long. Cut below a node.
2. Remove any lower leaves.
3. Dip the cut end into root hormone, then gently plant it into well-draining, rich soil.
4. Place the pot in a warm, sunny area. Keep the soil moist.
5. Roots should form in around one to two months.
Areca Palm

Areca Palm Care

Growing and caring for an Areca Palm (Dypsis lutescens), also known as the butterfly palm or golden cane palm, involves several key steps. Here is a detailed guide to help you successfully grow and care for this popular indoor and outdoor plant.
1. Choosing the Right Location
• Indoor: Place your Areca Palm in a bright, indirect light location. It thrives in bright, filtered light but can tolerate low light conditions for short periods.
• Outdoor: If grown outside, place it in a spot that gets partial shade. Avoid direct sunlight as it can scorch the leaves.
2. Soil Requirements
• Use well-draining soil, such as a potting mix designed for palms or a combination of peat, pine bark, and perlite. Ensure the soil has good aeration to prevent root rot.
3. Planting
• Potting: Choose a pot with drainage holes. Fill the bottom with a layer of pebbles or gravel to enhance drainage. Add the soil mix and plant the palm at the same depth it was growing in the previous container.
• Outdoor Planting: Dig a hole twice the size of the root ball, place the palm, and backfill with soil, ensuring it is planted at the same depth as in its original container.
Allamanda
Allamanda Care
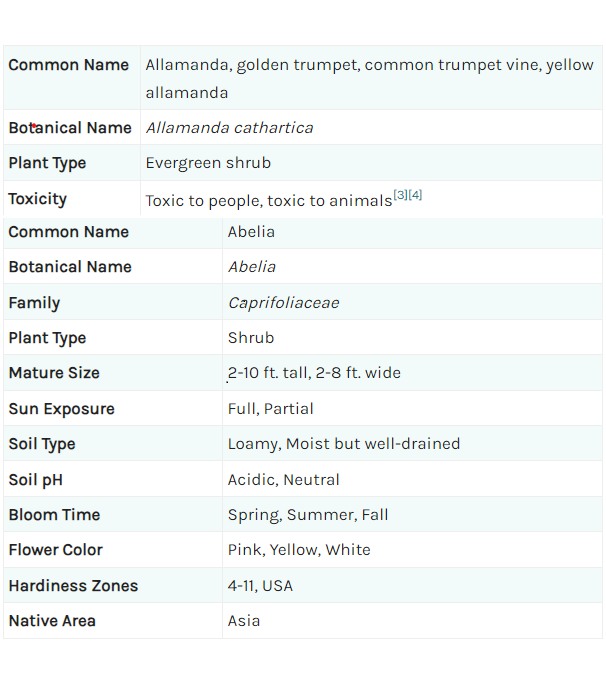
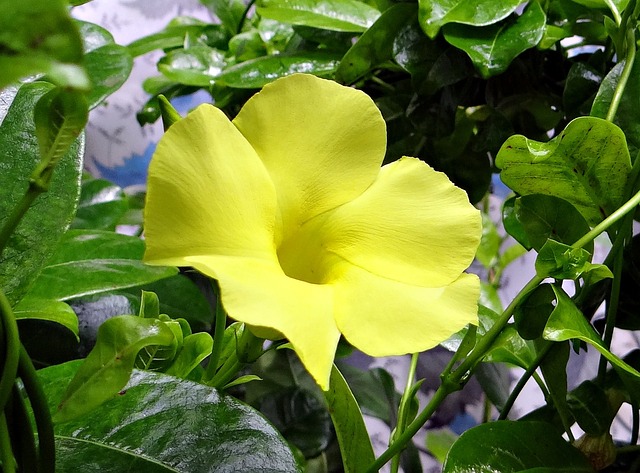
The Allamanda (commonly known as Golden Trumpet) is a tropical plant known for its vibrant, trumpet-shaped yellow flowers. It’s a beautiful addition to gardens, but it requires specific care to thrive. Here are key aspects of Allamanda care:
1. Sunlight
• Full Sun: Allamanda loves sunlight and should be placed in full sun for at least 6-8 hours a day. This promotes healthy growth and abundant flowering.
• Partial Shade: It can tolerate partial shade, but it may produce fewer flowers.
2. Wateringg
• Consistent Moisture: Water regularly, ensuring the soil stays moist but not waterlogged. Allamanda likes consistent moisture but is prone to root rot if left sitting in water.
• Water in the Morning: Watering in the morning helps the plant absorb moisture before the heat of the day.
3. Soil
• Well-draining Soil: Allamanda prefers well-draining, fertile soil rich in organic matter. A mix of garden soil with compost works well.
• Slightly Acidic to Neutral:The ideal pH for Allamanda is between 6.0 and 7.5.
4. Fertilizing
• Balanced Fertilizer: Apply a balanced, slow-release fertilizer (such as 10-10-10) every 4-6 weeks during the growing season. Liquid fertilizer works well for potted plants.
• High Potassium for Flowering: Fertilizers with higher potassium content may help promote more blooms.
5. Pruning
• Regular Pruning: Prune Allamanda to maintain shape and encourage bushier growth. It can become leggy, so cut back older stems to promote new growth.
• Remove Dead Flowers: Deadheading spent flowers helps redirect energy into producing new buds.
6. Temperature
• Warm Climate:Allamanda thrives in warm, tropical to subtropical climates. It’s sensitive to cold temperatures and will not survive frost.
• Temperature Range:Ideal temperatures are between 65°F to 80°F (18°C to 40°C).
7. Pest and Disease Management
• Common Pests: Watch out for spider mites, whiteflies, and aphids. Use insecticidal soap or neem oil for treatment.
• Fungal Diseases: Ensure good air circulation to prevent fungal diseases like powdery mildew. Avoid overhead watering and keep foliage dry.
8. Support
• Trellis or Support: Allamanda is a climbing plant, so providing a trellis or support can help it grow vertically. Without support, it may sprawl as a ground cover.
9. Propagation
• Stem Cuttings: The most common way to propagate Allamanda is through stem cuttings. Take cuttings from semi-hardwood stems and root them in moist soil.
10. Container Growth
• Pots: Allamanda grows well in containers, but make sure to use a pot with good drainage. You can move potted Allamanda indoors during colder months in cooler climates.
Aglaonema Commutatum
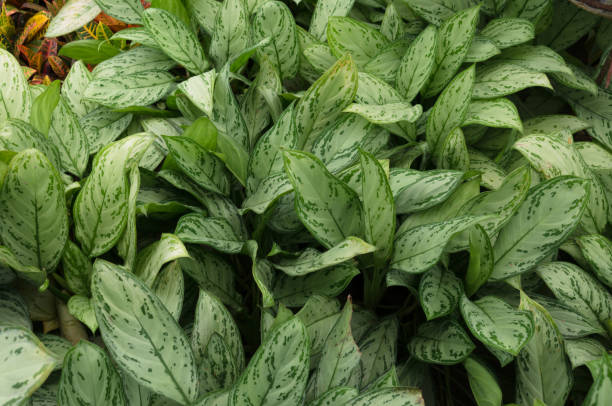
Aglaonema commutatum Care
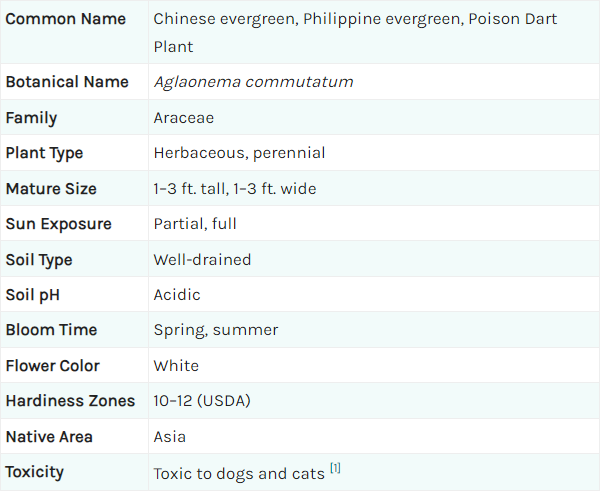
Aglaonema Commutatum commonly known as Chinese Evergreen, is a popular houseplant known for its attractive foliage and low maintenance requirements. It is an excellent choice for beginners due to its resilience. Here's a detailed care guide for your Aglaonema Commutatum:
1. Light Requirements:
• Low to medium light:Aglaonema thrives in low to medium indirect light, making it suitable for offices or rooms with minimal natural light. However, brighter indirect light helps in enhancing its foliage color.
• Avoid direct sunlight:Direct sun can scorch its leaves, causing brown spots.
2. Watering:
• Moderate watering: Allow the top 1-2 inches of soil to dry out between watering. Overwatering can lead to root rot, so be cautious about not leaving the plant in soggy soil.
• Frequency:Water every 1-2 weeks, depending on the room temperature and humidity. In winter, reduce watering as the plant’s growth slows.
3. Soil:
•Well-draining potting mix: Use a well-draining mix that allows excess water to flow out easily. A mix with perlite or sand is ideal.
• pH:It prefers a slightly acidic to neutral soil (pH 5.5-6.5).
4. Humidity:
• Moderate to high humidity: Aglaonema loves humidity, so misting the plant occasionally can be beneficial, especially in dry environments.
• Indoor humidity:It can tolerate normal household humidity, but aim for higher levels if possible.
5. Temperature:
• Ideal range: 65°F to 80°F (18°C to 27°C).
• Avoid drafts: Keep the plant away from cold drafts or sudden temperature drops. It is sensitive to temperatures below 60°F (15°C).
6. Fertilizing:
• During growing season: Feed with a balanced, liquid houseplant fertilizer every 4-6 weeks during the spring and summer.
• Less during winter: Reduce or stop feeding in the colder months when the plant is dormant.
7. Pruning and Cleaning:
• Remove yellow or damaged leaves: Trim any yellow or dying leaves to promote healthy growth.
• Wipe the leaves: Dust the leaves occasionally with a damp cloth to keep them clean and allow for better photosynthesis.
8. Propagation:
• Stem cuttings: Aglaonema can be propagated by stem cuttings. Cut a healthy stem with at least 3-4 leaves and place it in water or directly in soil.
• Division: You can also divide the plant at the root level when repotting.
9. Pests:
• Common pests: Keep an eye out for common pests such as spider mites, mealybugs, and aphids. Wipe the leaves regularly to prevent infestations, and treat any pests with insecticidal soap or neem oil.
10. Toxicity:
• Toxic to pets: Aglaonema is toxic to cats and dogs if ingested, so keep it out of reach of pets and children.
11. Repotting:
• Every 2-3 years: Repot the plant into a slightly larger pot every 2-3 years to allow room for growth. Choose a pot with drainage holes to prevent water from accumulating.
By following these simple care tips, your Aglaonema Commutatum will thrive and add beautiful greenery to your indoor space!
Money Plant (Epipremnum)
.jpg)
Money Plant (Epipremnum) Care
%20Table.png)
A money plant (commonly referring to Epipremnum aureum or Pachira aquatica) is a popular houseplant known for its easy care and believed association with good fortune and prosperity. Here’s a care guide to keep your money plant healthy:
1. Light
• Ideal: Bright, indirect sunlight.
• Tolerates: Low light conditions, but growth may slow.
• Avoid: Direct sunlight, which can scorch the leaves.
2. Watering
• Frequency: Water when the top 1-2 inches of soil feels dry.
• Avoid Overwatering: This is the leading cause of root rot. Ensure proper drainage.
• Humidity: Prefers moderate to high humidity but adapts to drier indoor air.
3. Soil
• Type: Well-draining potting mix, ideally with perlite or sand mixed in.
• For Pachira aquatica: A slightly heavier mix with peat moss or loamy soil works well.
4. Temperature
• Range: 65–85°F (18–29°C).
• Avoid: Drafts, cold air, or temperatures below 50°F (10°C).
5. Fertilizer
• Frequency: Feed with a balanced liquid fertilizer once a month during spring and summer
• Pause in Winter: Plants naturally grow slower and need less nourishment.
6. Pruning
•Trim leggy or yellowing stems to encourage bushier growth. For trailing varieties, pruning helps manage length.
7. Propagation
• Use stem cuttings with at least one node.
• Place the cutting in water or soil until roots develop.
8. Common Issues
• Yellowing Leaves: Overwatering or poor drainage.
• Brown Tips: Low humidity or underwatering.
• Pests: Occasionally, spider mites or mealybugs. Use neem oil or insecticidal soap.
snake plant (Sansevieria)
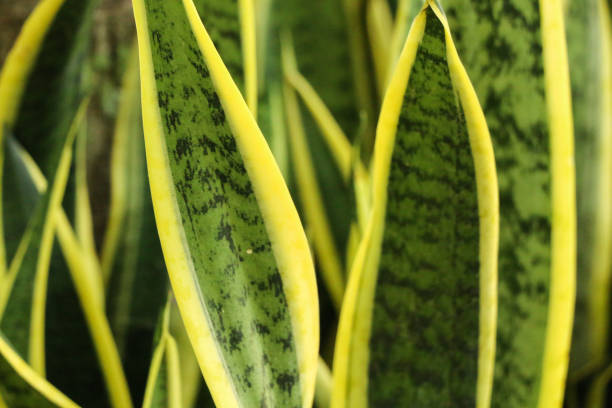
snake plant Care
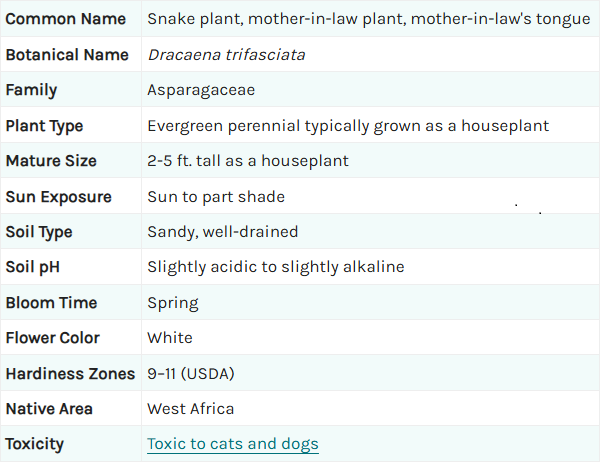
The snake plant (Sansevieria spp) is one of the easiest and most durable houseplants, prized for its tall, sword-like leaves and ability to thrive in various conditions. It's also known as Mother-in-Law’s Tongue or Viper’s Bowstring Hemp.
1. Light:
• Thrives in bright, indirect light, but it’s also highly tolerant of low-light conditions, making it perfect for any room.
• Avoid prolonged direct sunlight, which can scorch the leaves.
2. Watering:
• Let the soil dry out completely between waterings. Overwatering is the most common cause of problems like root rot.
•Water about every 2-6 weeks, depending on the season (less in winter)
3. Soil:
• Use a well-draining potting mix, such as a cactus or succulent mix, to prevent water retention.
• Ensure your pot has a drainage hole to avoid soggy roots.
4. Temperature:
• Prefers temperatures between 60–80°F (15–27°C).
• Protect the plant from frost, drafts, and extreme cold.
5. Humidity:
• Snake plants are drought-tolerant and thrive in normal indoor humidity. No special misting is required.
6. Fertilizer:
• Fertilize with a balanced houseplant fertilizer during the growing season (spring and summer) once a month.
• Do not fertilize during fall and winter when the plant is dormant.
7. Cleaning:
• Wipe the leaves with a damp cloth occasionally to remove dust and keep the plant looking fresh.
8. Repotting:
• Repot every 2-3 years or when the plant becomes root-bound. Use a slightly larger pot with fresh soil.
9. Propagation:
• Propagate by division (separating pups), leaf cuttings, or water propagation.
• Pups growing near the base can be carefully removed and replanted.
10. Pests:
• Snake plants are rarely affected by pests, but keep an eye out for mealybugs or spider mites. Treat with neem oil or insecticidal soap if needed.
* Note:
• Yellow or Mushy Leaves: Caused by overwatering. Allow the soil to dry completely and check for root rot.
• Brown Leaf Tips: Caused by underwatering, low humidity, or mineral buildup from tap water. Use filtered or distilled water.
• Curling Leaves: Indicates stress, often from inconsistent watering or pest infestations.
Aloe vera
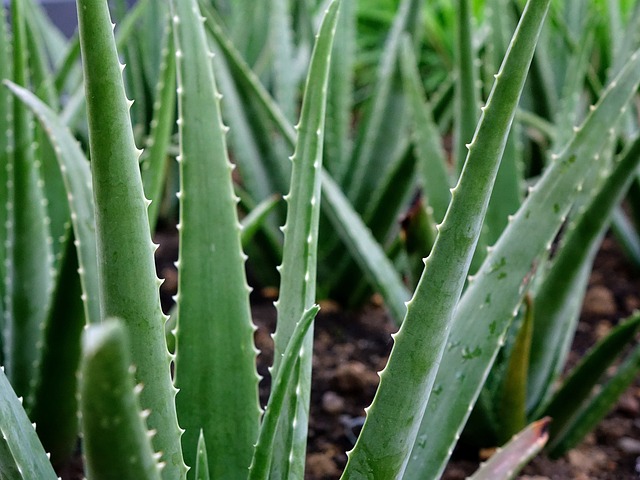
Aloe vera Care
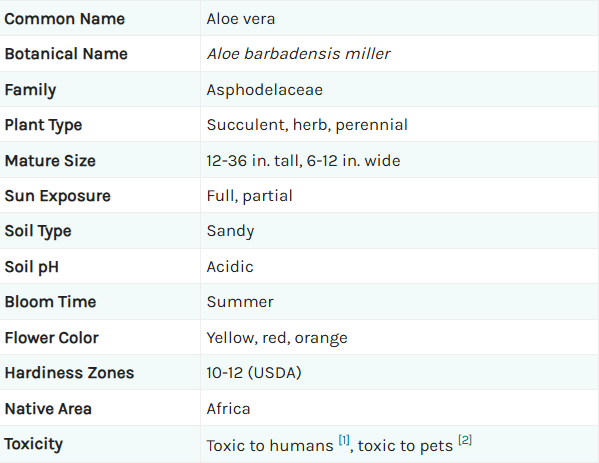
Aloe vera is a hardy, succulent plant widely known for its medicinal properties and easy maintenance. It’s a fantastic addition to any indoor or outdoor garden. Here’s a detailed guide for caring for your aloe vera plant:
1. Light:
• Place in bright, indirect sunlight or full sun for at least 6–8 hours a day.
• Indoors, a south- or west-facing window is ideal.
• Gradually acclimate to direct sunlight to avoid sunburn.
2. Watering:
• Water sparingly Allow the soil to dry out completely between waterings.
• Water every 2–3 weeks in spring/summer and reduce watering in fall/winter.
• Avoid getting water trapped in the leaves' rosette, as it can cause rot.
3. Soil:
• Use a well-draining cactus or succulent mix.
• Ensure the pot has drainage holes to prevent waterlogging.
4. Temperature and Humidity:
• Ideal temperature: 55–80°F (13–27°C).
• Protect from frost and cold drafts.
• Prefers low humidity; no misting required.
5. Fertilizer:
• Fertilize sparingly—once or twice during the growing season (spring/summer) with a succulent fertilizer or diluted houseplant fertilizer.
6. Potting and Repotting:
• Repot every 2–3 years or when the plant outgrows its pot.
• Choose a pot that’s slightly larger with good drainage.
7. Propagation:
• Remove offsets (pups) growing at the plant's base.
• Let the pup dry for 1–2 days, then plant it in fresh soil.
* Common Issues:
• Brown/Mushy Leaves: Overwatering or poor drainage. Let soil dry completely.
• Wrinkled Leaves: Underwatering. Give the plant a thorough soak.
• Yellow Leaves: Caused by overwatering, insufficient light, or root rot. Adjust care as needed.
• Sunburn: White or brown spots on leaves can occur if exposed to too much direct sunlight too quickly. Gradually acclimate to bright light.
ZZ plant (Zamioculcas zamiifolia)
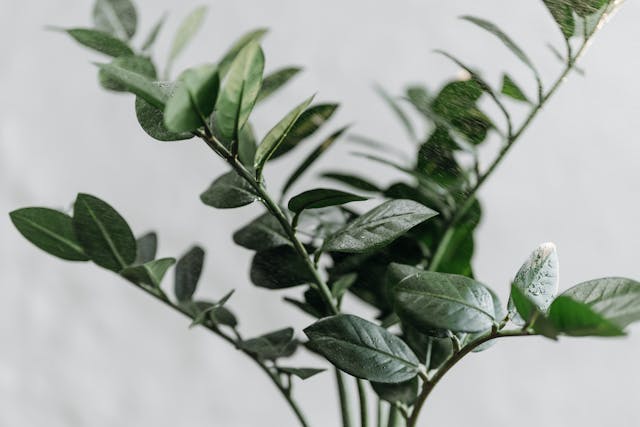
ZZ plant Care
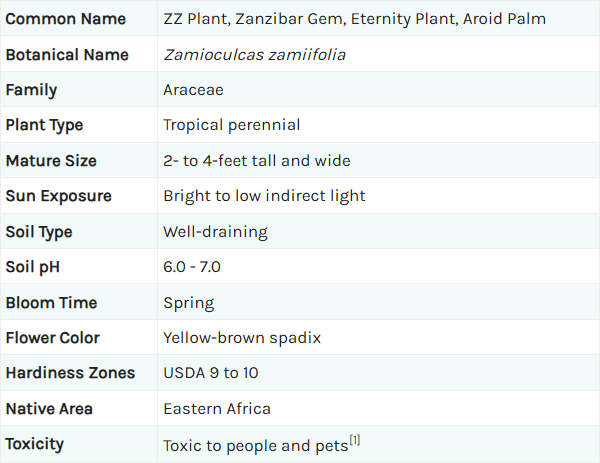
ZZ plant (Zamioculcas zamiifolia) is a stylish, low-maintenance houseplant known for its glossy, dark green leaves and incredible tolerance for neglect. Here’s how to keep it thriving:
1. Light:
• Prefers bright, indirect light, but can tolerate low-light conditions, making it ideal for offices or shaded spots.
• Avoid prolonged direct sunlight, which can scorch its leaves.
2. Watering:
• Water only when the soil is completely dry. Overwatering is the main cause of problems.
• During warmer months, water every 2–3 weeks; in winter, reduce to monthly or less.
3. Soil:
• Use a well-draining potting mix, such as one formulated for cacti or succulents.
• Ensure the pot has drainage holes to prevent waterlogging.
4. Temperature and Humidity:
• Thrives in temperatures between 60–75°F (15–24°C).
• Tolerates average indoor humidity and does not require misting.
• Keep away from cold drafts and freezing temperatures.
5. Fertilizer:
• Fertilize lightly during the growing season (spring and summer) with a balanced houseplant fertilizer once a month.
• Avoid fertilizing in fall and winter when the plant is dormant.
6. Repotting:
• Repot every 2–3 years or when the plant becomes root-bound.
• Choose a pot slightly larger than the current one and refresh with new soil.
7. Propagation:
• Division: Separate the plant at the rhizomes (underground tubers) during repotting.
• Leaf Cuttings: Cut a healthy leaf or leaflets and place them in soil or water until roots develop. Be patient, as this can take several months, so patience is key.
* Notes
• Yellowing Leaves: Often due to overwatering. Allow the soil to dry out and check for root rot.
• Drooping Stems: Indicates overwatering or, less commonly, underwatering. Adjust your watering schedule.
• Brown Tips: Caused by underwatering or low humidity. Increase watering slightly.
• Slow Growth: Normal for ZZ plants, but more light and occasional feeding during spring/summer can encourage growth.
English Ivy (Hedera helix)
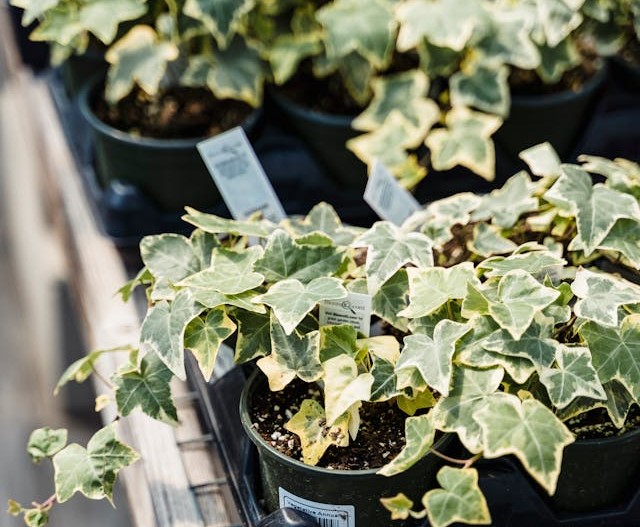
English Ivy Care
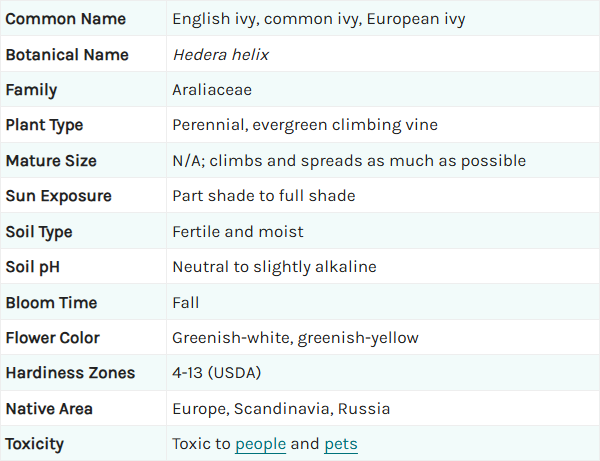
English Ivy (Hedera helix) is a versatile and elegant trailing plant that thrives both indoors and outdoors. Here’s how to care for it:
1. Light:
• Indoors: Prefers bright, indirect light but can tolerate low-light conditions.
• Outdoors: Thrives in partial to full shade.
• Avoid direct sunlight, which can scorch the leaves, especially variegated varieties.
2. Watering:
• Keep the soil consistently moist but not soggy. Water when the top 1–2 inches of soil feels dry.
• Avoid letting the plant sit in water, as it can lead to root rot.
• Reduce watering during the winter when growth slows.
3. Soil:
• Use a well-draining potting mix.
• English ivy isn’t too fussy and can grow in standard potting soil, but adding perlite or sand improves drainage.
4. Temperature and Humidity:
• Ideal temperature: 50–75°F (10–24°C).
• Enjoys moderate to high humidity. If indoors, consider misting the plant or placing it near a humidifier, especially in dry environments.
5. Fertilizer:
• Feed with a balanced liquid fertilizer once a month during the growing season (spring and summer).
• Do not fertilize in the winter when the plant is dormant.
6. Pruning:
• Prune regularly to control its growth, remove leggy stems, and promote bushier foliage.
• Trim away any dead or yellowing leaves to keep the plant healthy.
7. Repotting:
• Repot every 1–2 years or when the plant becomes root-bound.
• Choose a pot with good drainage.
8. Propagation:
• Propagate easily through stem cuttings:
1. Take a cutting just below a leaf node.
2. Place it in water or moist soil.
3. Roots typically develop in 2–3 weeks.
Common Problems and Solutions:
1. Yellowing Leaves: Caused by overwatering or poor drainage. Let the soil dry out slightly before watering again.
2. Browning Edges: Indicates underwatering or low humidity. Increase watering or mist the leaves.
3. Pests: Susceptible to spider mites, aphids, and mealybugs. Treat with neem oil or insecticidal soap.
4. Leggy Growth: Occurs when the plant isn’t getting enough light. Move to a brighter spot.
Philodendron
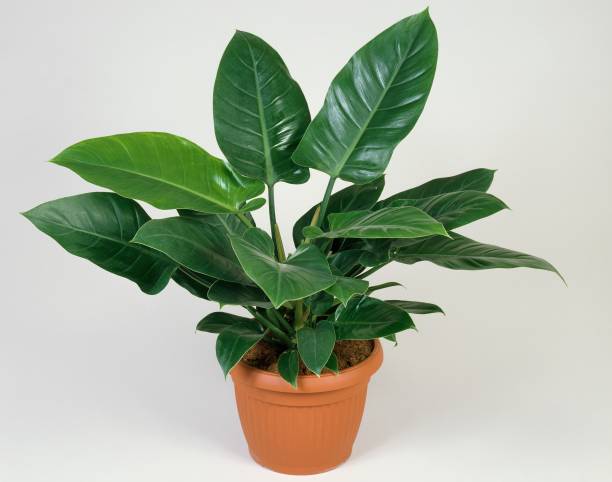
Philodendron Care
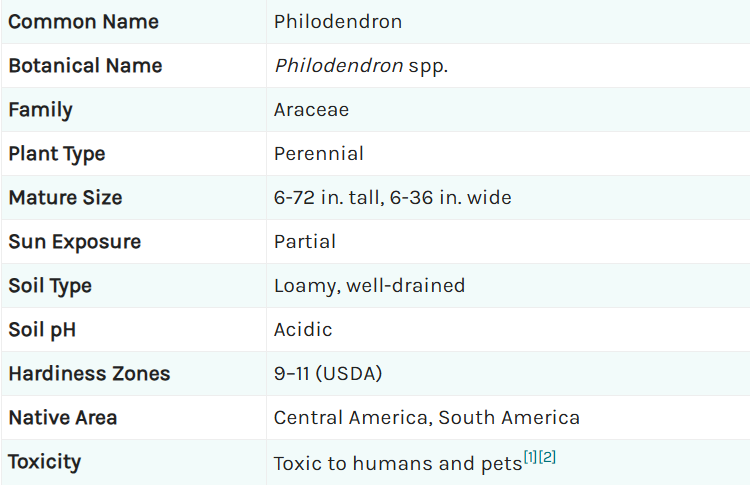
Philodendron are popular houseplants known for their lush, tropical foliage and easygoing care requirements. Whether you have a climbing or non-climbing variety, here’s how to care for them:
1. Light:
• Ideal: Bright, indirect light.
• Tolerant: Low light, but growth may slow, and leaves may become smaller.
• Avoid direct sunlight, which can scorch the leaves
2. Watering:
• Water when the top 1–2 inches of soil feel dry.
• Philodendron prefer slightly moist soil but dislike overwatering. Allow excess water to drain to prevent root rot.
• Reduce watering in winter when the plant’s growth slows.
3. Soil:
• Use a well-draining potting mix rich in organic matter. A mix for indoor plants or one designed for aroids works well.
• Adding perlite or orchid bark helps improve aeration.
4. Temperature and Humidity:
• Temperature: Prefers 65–80°F (18–27°C). Protect from cold drafts and temperatures below 55°F (13°C).
• Humidity: Thrives in higher humidity but adapts to average indoor conditions. Misting, a pebble tray, or a humidifier can help in dry environments.
5. Fertilizer:
• Feed with a balanced liquid houseplant fertilizer once a month during spring and summer.
• Reduce or stop fertilizing in fall and winter.
6. Pruning:
• Prune regularly to maintain shape, remove yellow or dead leaves, and encourage bushier growth.
• For vining types, trim long stems to keep the plant tidy or encourage climbing.
7. Support:
• Climbing varieties (e.g., Philodendron hederaceum) benefit from a moss pole or trellis for vertical growth.
• Non-climbing varieties (e.g., Philodendron selloum) grow as self-supporting shrubs.
8. Repotting:
• Repot every 2–3 years or when the plant becomes root-bound.
• Use a pot 1–2 inches larger with fresh soil.
9. Propagation:
• Cut a healthy stem just below a node (where the leaf meets the stem).
• Place the cutting in water or soil.
• Roots will form in 2–4 weeks; plant in soil if started in water.
Common Problems and Solutions:
• Yellowing Leaves: Often due to overwatering. Let the soil dry out and ensure proper drainage.
• Brown Leaf Tips: Caused by underwatering, low humidity, or fertilizer burn. Adjust care accordingly.
• Leggy Growth: Indicates insufficient light. Move to a brighter location.
• Pests: Susceptible to spider mites, mealybugs, and aphids. Treat with neem oil or insecticidal soap.
Rubber Plant (Ficus elastica)
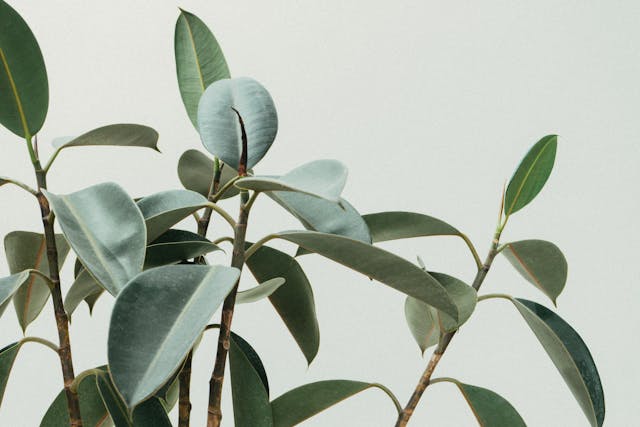
Rubber Plant Care

Rubber Plant (Ficus elastica)is a striking houseplant known for its broad, glossy leaves. It’s relatively low-maintenance, making it a favorite for both new and experienced plant owners. Here’s how to care for it:
1. Light:
• Bright, indirect light is ideal.
• Can tolerate moderate light, but growth may slow, and leaves may lose their luster.
• Avoid direct sunlight, which can scorch the leaves.
2. Watering:
• Water when the top 1–2 inches of soil feel dry.
• Keep the soil evenly moist but not soggy during spring and summer. Reduce watering in fall and winter when growth slows.
• Avoid overwatering, which can cause leaf drop or root rot.
3. Soil:
• Use a well-draining potting mix, such as a mix designed for houseplants.
• Add perlite or sand to improve drainage if necessary.
4. Temperature and Humidity:
• Thrives in temperatures between 60–80°F (16–27°C).
• Avoid temperatures below 55°F (13°C) and keep away from cold drafts.
• Prefers moderate humidity; if your home is very dry, occasional misting or a pebble tray can help.
5. Fertilizer:
• Feed with a balanced liquid fertilizer once a month during the growing season (spring and summer).
• Do not fertilize in the winter.
6. Cleaning and Pruning:
• Wipe the leaves occasionally with a damp cloth to remove dust and keep them shiny.
• Prune to remove any dead or damaged leaves and to shape the plant.
7. Repotting:
• Repot every 1–2 years or when the plant becomes root-bound.
• Use a pot 1–2 inches larger in diameter with fresh soil.
8. Propagation:
• Cut a healthy stem just below a node and let the sap dry for a few minutes.
• Place the cutting in water or moist soil.
• Roots typically develop in 2–4 weeks.
Common Problems and Solutions:
• Yellow or Dropping Leaves: Often due to overwatering or sudden changes in temperature or light. Allow soil to dry slightly between waterings and maintain consistent conditions.
• Brown Edges or Spots: Caused by underwatering, low humidity, or salt buildup. Adjust watering habits and consider using filtered water.
• Leggy Growth: The plant needs more light. Move it to a brighter spot.
• Pests: Susceptible to spider mites, mealybugs, and scale insects. Treat with neem oil or insecticidal soap if needed.
Monstera Plant (Monstera deliciosa)

Monstera Plant Care
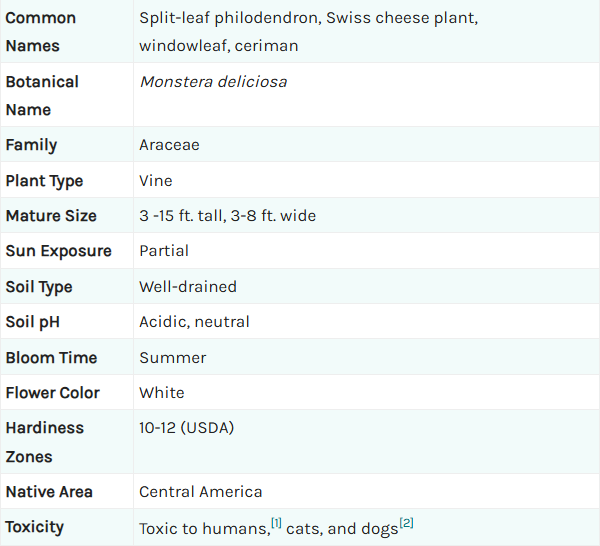
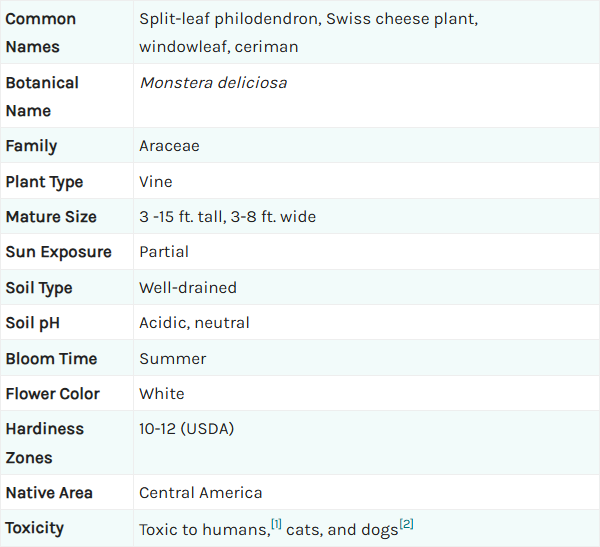
Monstera plant (Monstera deliciosa)often called the "Swiss cheese plant" for its unique, perforated leaves, is a popular choice for indoor plant enthusiasts. Here's how to keep your Monstera thriving:
1. Light:
• Bright, indirect light is ideal for optimal growth and leaf fenestration (the holes in the leaves).
• Can tolerate low light but will grow slower and may develop smaller, unperforated leaves.
• Avoid direct sunlight, as it can scorch the leaves.
2. Watering:
• Water when the top 2–3 inches of soil feel dry.
• Monstera prefers slightly moist soil but is sensitive to overwatering. Ensure the pot has good drainage.
• Reduce watering during the dormant season (fall and winter).
3. Soil:
• Use a well-draining potting mix, such as one designed for aroids or houseplants.
• Adding perlite, orchid bark, or coconut coir helps improve aeration and drainage.
4. Temperature and Humidity:
• Thrives in temperatures between 65–85°F (18–29°C).
• Prefers high humidity, but adapts to average indoor humidity. To increase humidity, use a humidifier, mist the leaves, or place the pot on a pebble tray.
• Avoid cold drafts and temperatures below 50°F (10°C).
5. Fertilizer:
• Feed with a balanced liquid fertilizer every 4–6 weeks during the growing season (spring and summer).
• Reduce feeding in the fall and winter when growth slows.
6. Pruning and Cleaning:
• Prune to control size, encourage bushier growth, and remove yellow or damaged leaves.
• Wipe the leaves with a damp cloth regularly to remove dust and keep them glossy.
7. Support:
• Monstera is a natural climber and benefits from a moss pole, trellis, or stake for support. Providing something to climb will encourage larger, more fenestrated leaves.
8. Repotting:
• Repot every 1–2 years or when the plant becomes root-bound.
• Use a pot 1–2 inches larger with fresh soil.
9. Propagation:
• Cut a healthy stem with at least one node (the point where a leaf and aerial root meet).
• Place the cutting in water or directly into moist soil.
• Roots typically develop within 2–4 weeks.
* Notes
• Yellow Leaves: Caused by overwatering. Let the soil dry out before watering again.
• Brown Leaf Tips: Indicates underwatering, low humidity, or excessive fertilizer. Adjust accordingly.
• Leggy Growth: The plant needs more light. Move to a brighter spot with indirect sunlight.
• Pests: Susceptible to spider mites, mealybugs, and scale insects. Treat with neem oil or insecticidal soap if needed.
Boston Fern (Nephrolepis exaltata)
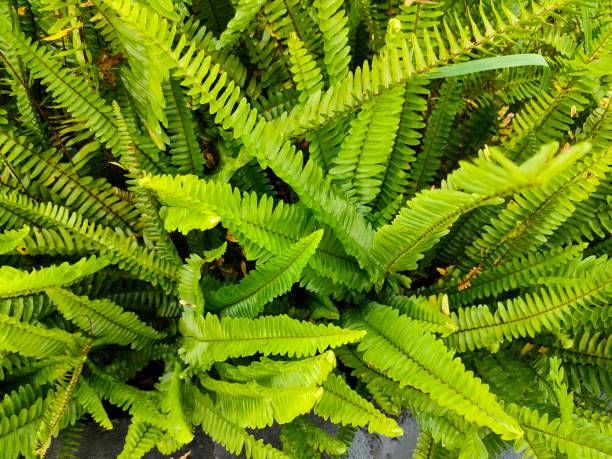
Boston Fern Care
Boston Fern (Nephrolepis exaltata),with its lush, arching fronds, is a classic houseplant that thrives in humid and shaded conditions. While it’s not the easiest plant to care for, understanding its preferences can help you keep it healthy and vibrant.
1. Light:
• Prefers bright, indirect light.
• Can tolerate partial shade, making it great for rooms with filtered light.
• Avoid direct sunlight, as it can scorch the fronds.
2. Watering:
• Keep the soil consistently moist but not soggy.
• Check the top inch of soil and water when it feels slightly dry.
• Use lukewarm, filtered water if possible, as Boston Ferns can be sensitive to chemicals in tap water.
3. Humidity:
• Thrives in high humidity (above 50%).
• Boost humidity by:
a. Misting the plant daily.
b. Using a humidifier.
c. Placing the pot on a tray filled with pebbles and water.
4. Temperature:
• Prefers temperatures between 60–75°F (15–24°C).
• Avoid cold drafts, sudden temperature changes, or placing it near heating vents.
5. Soil:
• Use a rich, well-draining potting mix with good moisture retention.
• Adding peat moss or coconut coir to the mix helps retain moisture.
6. Fertilizer:
• Feed monthly during the growing season (spring and summer) with a diluted balanced liquid fertilizer.
• Avoid over-fertilizing, as it can damage the roots. Skip feeding in fall and winter when growth slows.
7. Pruning and Maintenance:
• Remove yellow or dead fronds regularly to keep the plant healthy and encourage new growth.
• Check the plant for pests and diseases during pruning.
8. Repotting:
• Repot every 1–2 years or when the plant becomes root-bound.
• Choose a pot that’s 1–2 inches larger and refresh the soil.
9. Placement:
• Boston Ferns do well in bathrooms or kitchens where humidity is naturally higher.
* Notes
• Brown or Crispy Fronds: Likely due to low humidity or underwatering. Increase humidity and water more consistently.
• Yellowing Leaves: Can result from overwatering or poor drainage. Allow the soil to dry slightly before watering again.
• Frond Drop: Often caused by stress, such as sudden temperature changes or low humidity. Maintain stable conditions.
• Pests: Watch for spider mites, mealybugs, and scale. Treat infestations with neem oil or insecticidal soap.
Fiddle Leaf Fig (Ficus lyrata)
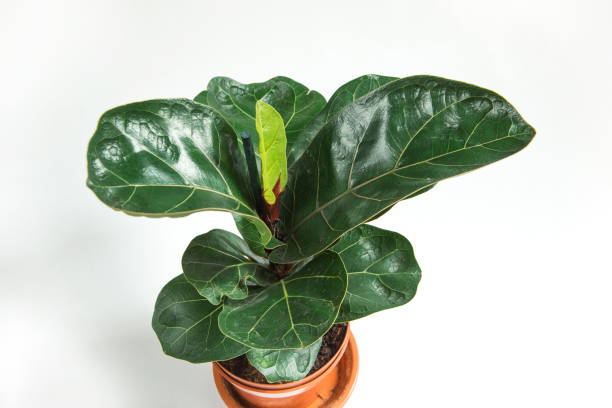
Fiddle Leaf Fig Care
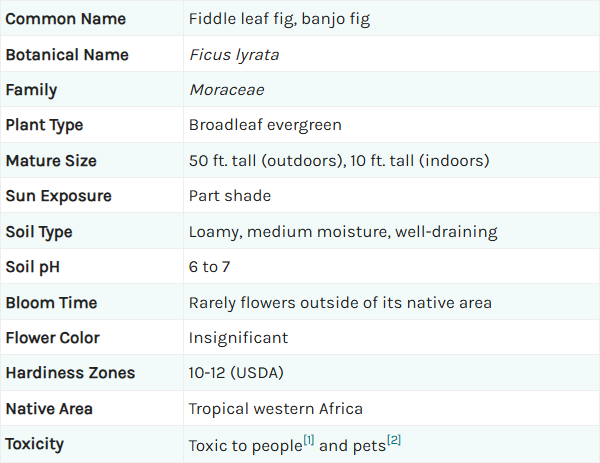
Fiddle Leaf Fig (Ficus lyrata) is a stunning houseplant known for its dramatic, glossy leaves. While it can be a bit finicky, proper care will ensure it thrives and becomes a centerpiece in your home. Here's how to care for it:
1. Light:
• Loves bright, indirect light.
• Place near a sunny east or south-facing window for best results.
• Can tolerate some direct morning sunlight but avoid harsh afternoon rays that can scorch the leaves.
2. Watering:
• Water when the top 2–3 inches of soil feel dry.
• Avoid overwatering, as it can lead to root rot. Ensure excess water drains out of the pot.
• Use lukewarm, filtered water if possible, as Fiddle Leaf Figs can be sensitive to cold water and tap chemicals.
3. Soil:
• Use a well-draining potting mix, such as one designed for indoor plants or aroids.
• Add perlite or sand to improve drainage.
4. Temperature and Humidity:
• Prefers temperatures between 65–75°F (18–24°C).
• Does not tolerate drafts, cold temperatures, or sudden changes in environment.
• Enjoys moderate humidity (40–60%). If your home is very dry, use a humidifier or mist occasionally.
5. Fertilizer:
• Feed with a balanced liquid fertilizer once a month during the growing season (spring and summer).
• Do not fertilize in fall and winter when growth slows.
6. Cleaning and Pruning:
• Wipe the leaves with a damp cloth regularly to remove dust and improve photosynthesis.
• Prune to remove any damaged or yellowing leaves and to shape the plant.
7. Repotting:
• Repot every 1–2 years or when the plant becomes root-bound.
• Use a pot 1–2 inches larger with fresh soil.
8. Rotation:
• Rotate the plant every few weeks so all sides receive light, promoting even growth.
* Notes
• Brown Spots or Edges: Overwatering or underwatering. Check soil moisture and adjust your watering routine.
• Yellow Leaves: Often caused by overwatering. Ensure the soil dries out between waterings.
• Drooping Leaves: Can occur due to underwatering, overwatering, or sudden changes in light or temperature. Investigate and correct the issue.
• Leaf Drop: Stress from moving, drafts, or inconsistent care. Give the plant time to adjust and maintain a consistent environment.
• Pests: Susceptible to spider mites, mealybugs, and scale insects. Treat infestations with neem oil or insecticidal soap.
Tips for Success:
• Avoid moving the plant frequently, as it dislikes changes in light and environment.
• Be patient! Fiddle Leaf Figs can be slow growers but are worth the wait.
• Provide support, such as a stake, for young or tall plants to prevent them from toppling over.
Dracaena
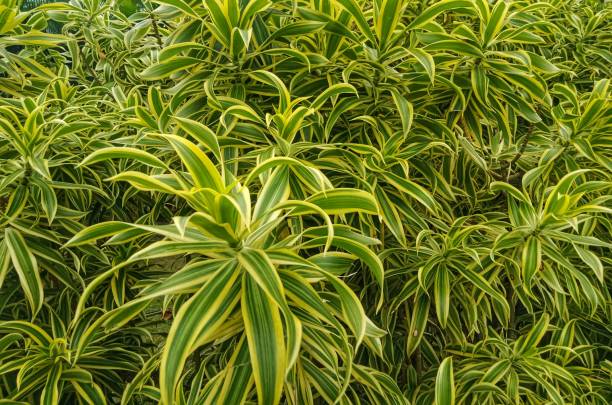
Dracaena Care
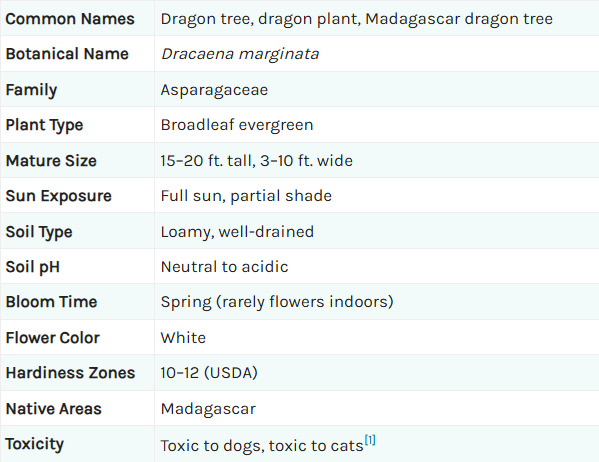
Dracaena plants are a popular choice for homes and offices due to their striking foliage and ease of care. With various species such as Dracaena marginata (Dragon Tree), Dracaena fragrans (Corn Plant), and Dracaena reflexa (Song of India), they’re versatile and forgiving. Here's how to care for them:
1. Light:
• Thrives in bright, indirect light, but many species can tolerate low-light conditions.
• Avoid direct sunlight, which can scorch the leaves, especially variegated varieties.
• Too little light may cause the leaves to lose their vibrant color.
2. Watering:
• Water when the top 2–3 inches of soil feel dry.
• Dracaena prefers slightly dry soil. Overwatering can lead to root rot.
• Use filtered or distilled water, as Dracaena is sensitive to fluoride and salts found in tap water.
3. Soil
• Use a well-draining potting mix, such as a general-purpose indoor plant soil.
• Adding perlite or sand helps improve drainage.
4. Temperature and Humidity:
• Temperature: 65–80°F (18–27°C). Avoid cold drafts or temperatures below 50°F (10°C).
• Humidity: Dracaena adapts to average indoor humidity but appreciates occasional misting in dry environments.
5. Fertilizer:
• Feed with a balanced liquid fertilizer every 4–6 weeks during spring and summer.
• Do not fertilize in the fall and winter when growth slows.
6. Pruning:
• Prune to remove yellowing or damaged leaves.
• For tall varieties like Dracaena marginata, trim the cane to control height and encourage new growth.
7. Repotting:
• Repot every 2–3 years or when the plant becomes root-bound.
• Use a pot 1–2 inches larger with fresh soil.
8. Propagation:
• Dracaena can be propagated through stem cuttings:
a. Cut a section of the cane with at least one node.
b. Plant the cutting in moist soil or place it in water until roots develop.
Common Problems and Solutions:
• Yellowing Leaves: Often caused by overwatering. Let the soil dry out before watering again.
• Brown Leaf Tips: Caused by fluoride or salt buildup, underwatering, or low humidity. Use distilled water and increase humidity if necessary.
• Drooping Leaves: Could indicate underwatering, overwatering, or sudden temperature changes. Check soil moisture and environmental conditions.
• Pests: Susceptible to spider mites, mealybugs, and scale insects. Treat infestations with neem oil or insecticidal soap.
Chinese Evergreen (Aglaonema)
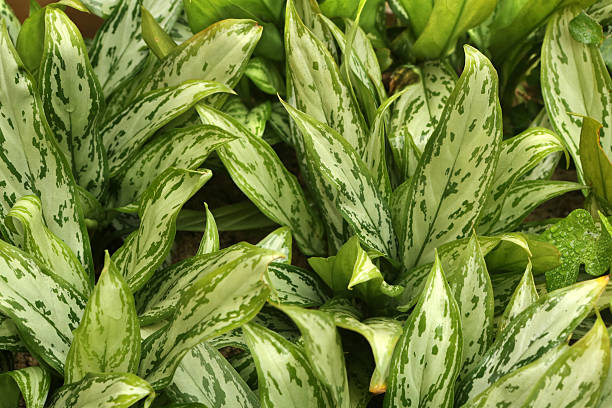
Chinese Evergreen Care
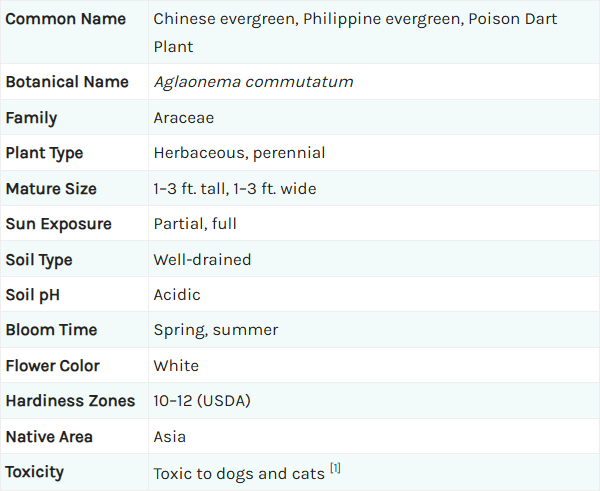
Chinese Evergreen (Aglaonema) is a hardy and attractive houseplant, prized for its vibrant, patterned leaves and low-maintenance care. It’s a perfect choice for beginners or anyone looking for a resilient indoor plant. Here's how to care for it:
1. Light:
• Thrives in low to medium indirect light, making it ideal for rooms with minimal natural light.
• Variegated varieties prefer brighter, indirect light to maintain their colorful patterns.
• Avoid direct sunlight, which can scorch the leaves.
2. Watering:
• Water when the top 2–3 inches of soil feel dry.
• Keep the soil evenly moist but not soggy. Overwatering can lead to root rot.
• Reduce watering during the winter months when growth slows.
3. Soil:
• Use a well-draining potting mix. A mix designed for houseplants or one with added perlite works well.
4. Humidity:
• Prefers moderate to high humidity (40–60%).
• If the air is dry, increase humidity by misting the plant, using a humidifier, or placing it on a pebble tray with water.
5. Temperature:
• Enjoys temperatures between 65–80°F (18–27°C).
• Avoid exposure to temperatures below 60°F (15°C), cold drafts, or sudden temperature changes.
6. Fertilizer:
• Feed with a balanced liquid fertilizer once a month during the growing season (spring and summer).
• Skip feeding in fall and winter when growth naturally slows.
7. Cleaning and Pruning:
• Wipe the leaves with a damp cloth to remove dust and keep them shiny.
• Trim yellow or damaged leaves to encourage healthy growth.
8. Repotting:
• Repot every 2–3 years or when the plant outgrows its pot.
• Use a pot 1–2 inches larger with fresh soil.
Common Problems and Solutions:
• Yellow Leaves: Often caused by overwatering. Allow the soil to dry slightly before watering again.
• Brown Leaf Tips: Indicates low humidity, fluoride in water, or inconsistent watering. Use filtered water and increase humidity if needed.
• Leggy Growth: Caused by insufficient light. Move the plant to a brighter location with indirect sunlight.
• Pests: Susceptible to spider mites, mealybugs, and scale. Treat infestations with neem oil or insecticidal soap.
Rose (Rosa)
.jpg)
Rose Care
%20Table.png)
Rose (Rosa spp.) are classic, elegant plants that can thrive both indoors and outdoors with proper care. While they require some attention, their stunning blooms make the effort worthwhile. Here’s how to care for your rose plant:
1. Light:
• Full sun is essential, with at least 6–8 hours of direct sunlight daily.
• If growing ROSE indoors, place them near a south-facing window or use grow lights.
2. Watering:
• Water deeply and consistently, keeping the soil evenly moist but not soggy.
• ROSE need more water during hot or dry weather.
• Water at the base of the plant to avoid wetting the leaves, which can lead to fungal diseases.
3. Soil:
• Use well-draining soil enriched with organic matter like compost or aged manure.
• ROSE prefer slightly acidic soil with a pH of 6.0–6.5.
4. Fertilizer:
• Feed ROSE with a balanced fertilizer (10-10-10 or 12-12-12) during the growing season (spring to early fall).
• Apply fertilizer every 4–6 weeks, but avoid over-fertilizing, which can harm the plant.
5. Pruning:
• Prune in late winter or early spring before new growth starts.
• Remove dead, damaged, or diseased branches to promote healthy growth.
• Cut back stems to about one-third of their height to encourage flowering.
6. Mulching:
• Apply a 2–3 inch layer of organic mulch (e.g., bark, wood chips, or straw) around the base of the plant.
• Mulch helps retain moisture, regulate soil temperature, and suppress weeds.
7. Pest and Disease Control:
• Common pests: Aphids, spider mites, and Japanese beetles. Treat with insecticidal soap, neem oil, or hand-picking.
• Common diseases: Powdery mildew, black spot, and rust. Prevent by ensuring good air circulation and avoiding overhead watering. Use fungicides if necessary.
8. Air Circulation:
• Space ROSE apart to allow proper air circulation, which reduces the risk of fungal diseases.
9. Winter Care:
• For outdoor ROSE, protect them during winter by mounding soil or mulch around the base and covering with burlap or rose cones.
• Indoor ROSE may need supplemental light and less water during dormancy.
Tips for Indoor ROSE:
• Choose miniature or patio ROSE, as they adapt better to indoor conditions.
• Ensure proper drainage to prevent root rot.
• Keep the plant in a cool, well-ventilated area with adequate light.
Common Problems and Solutions:
• Yellow Leaves: Caused by overwatering, underwatering, or nutrient deficiencies. Adjust care accordingly.
• Lack of Blooms: Could result from too little sunlight, improper pruning, or insufficient nutrients.
• Wilting: Often due to underwatering or root rot. Check soil moisture and drainage.
Rose Care Year-Round:
• Spring: Prune, fertilize, and watch for new growth.
• Summer: Water regularly and deadhead spent blooms to encourage more flowers.
• Fall: Reduce watering and fertilization as growth slows. Prepare outdoor ROSE for winter.
• Winter: Protect outdoor ROSE and allow indoor ROSE to rest with minimal care.
Sunflower (Helianthus annuus)

Sunflower Care
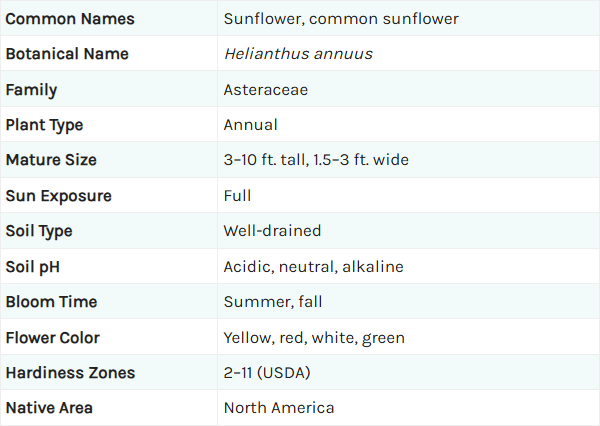
Sunflower (Helianthus annuus) are iconic, cheerful plants known for their towering stems and large, bright blooms. They are relatively easy to grow and can be a wonderful addition to your garden or even as potted plants indoors. Here's how to care for them:
1. Light:
• Full sun is essential for sunflower. They need at least 6–8 hours of direct sunlight daily to thrive.
• If growing indoors, place the plant near a sunny south-facing window or use grow lights.
2. Watering:
• Water sunflower deeply but infrequently.
• Allow the soil to dry slightly between waterings, especially after the seedlings have established.
• During dry spells or when grown in pots, they may need watering 1–2 times per week.
3. Soil:
• sunflower prefer well-draining soil rich in organic matter.
• The soil should be loose and slightly acidic to neutral (pH 6.0–7.5).
4. Fertilizer:
• Use a balanced fertilizer sparingly. Too much nitrogen can lead to lush foliage but fewer blooms.
• Apply a fertilizer high in phosphorus and potassium to encourage flowering.
5. Planting and Spacing:
• Sow seeds directly outdoors after the last frost.
• Plant seeds about 1 inch deep and 6–12 inches apart (depending on the variety).
• For larger sunflower varieties, space them 12–24 inches apart to allow ample room for growth.
6. Support:
• Tall sunflower varieties may require staking to prevent them from toppling over, especially in windy areas.
• Use bamboo stakes or garden ties to secure the stems.
7. Pruning and Deadheading:
• Remove spent blooms (deadheading) to encourage continuous flowering for branching sunflower varieties.
• For single-stem varieties, allow the bloom to mature fully if you want to harvest seeds.
8. Pests and Diseases:
• Common pests: Aphids, caterpillars, and sunflower beetles. Treat infestations with neem oil or insecticidal soap.
• Diseases: Fungal infections like powdery mildew or rust can occur in humid conditions. Ensure proper spacing for airflow and avoid wetting the leaves during watering.
9. Harvesting Seeds:
• Allow the flower heads to dry on the plant. When the back of the head turns brown and seeds loosen easily, it’s time to harvest.
• Cut the head and hang it upside down in a dry, well-ventilated area.
Indoor Sunflower Care:
• Choose dwarf sunflower varieties for indoor growing, as they are more manageable in size.
• Use a deep pot with good drainage to accommodate their long roots.
• Rotate the pot regularly to ensure even growth toward the light source.
Benefits of sunflower:
• Attract Pollinators: Bees, butterflies, and birds are drawn to sunflower.
• Edible Seeds: Sunflower seeds are nutritious and can be roasted for snacks or used in cooking.
• Soil Improvement: Their deep roots help aerate and improve soil quality.
Lavender (Lavandula)
Lavender Care
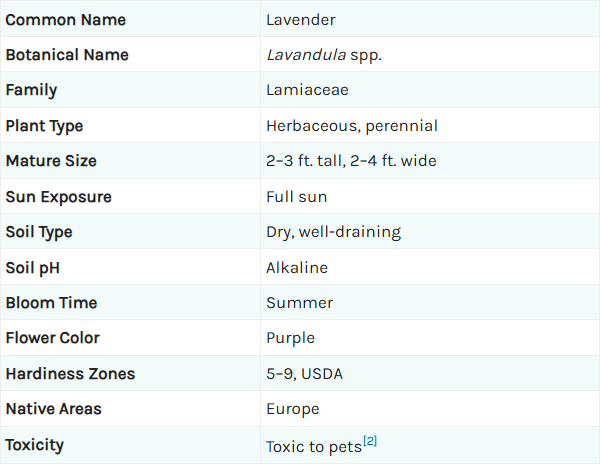
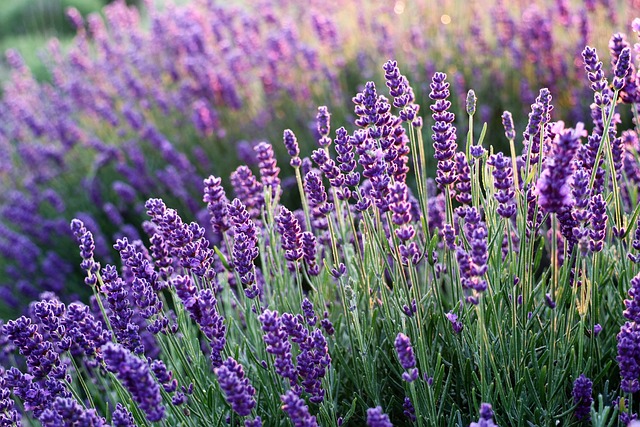
Lavender (Lavandula) is a fragrant, versatile herb that's beloved for its calming scent, beautiful blooms, and low-maintenance nature. Whether grown in gardens or pots, lavender thrives with proper care. Here's how to keep it healthy and flourishing:
1. Light:
• Requires full sun for at least 6–8 hours daily.
• Lavender loves bright, direct sunlight and thrives best in sunny, open areas.
• Indoors, place it near a south-facing window or use grow lights.
2. Watering:
• Lavender prefers dry soil conditions and does not like overwatering.
• Water deeply but infrequently. Allow the top 1–2 inches of soil to dry out between waterings.
• Established lavender is drought-tolerant but may need watering during prolonged dry spells.
3. Soil:
• Use well-draining, sandy, or rocky soil.
• Lavender prefers slightly alkaline to neutral soil with a pH of 6.5–8.0.
• If growing in pots, use a mix of potting soil and sand or gravel for drainage.
4. Fertilizer:
• Lavender is a light feeder and typically doesn’t require much fertilization.
• If needed, use a low-nitrogen fertilizer or compost in spring to promote flowering rather than leafy growth.
5. Pruning:
• Prune lavender in early spring or after blooming to shape the plant and remove dead stems.
• Cut back about one-third of the plant, avoiding cutting into old, woody stems as they don’t regenerate well.
• Regular pruning encourages bushier growth and more blooms.
6. Temperature:
• Thrives in warm climates with temperatures between 60–85°F (15–30°C).
• Protect lavender from frost in colder regions by mulching or moving potted plants indoors during winter.
• Hardy varieties like English lavender (Lavandula angustifolia) tolerate colder climates better than others.
7. Humidity:
• Lavender prefers low to moderate humidity.
• In humid climates, ensure good air circulation around the plant to prevent fungal diseases.
8. Container Growing:
• Lavender grows well in containers, making it suitable for small spaces or balconies.
• Use a pot with drainage holes and ensure it’s large enough to accommodate the plant’s root system.
* Note
• Yellowing Leaves: Often caused by overwatering. Ensure the soil dries out between waterings.
• Lack of Blooms: May result from insufficient sunlight, over-fertilizing, or improper pruning. Ensure full sun and avoid overfeeding.
• Leggy Growth: Happens when the plant doesn’t get enough sunlight. Relocate to a sunnier spot.
• Fungal Diseases: Reduce watering, improve drainage, and ensure good airflow to prevent mildew and rot.
Uses for Lavender:
• Aromatherapy: Dried flowers and essential oil for relaxation.
• Culinary: Use edible varieties to flavor teas, desserts, or savory dishes.
• Decor: Fresh or dried lavender adds charm to bouquets and wreaths.
• Gardening: Attracts pollinators like bees and butterflies while repelling pests like mosquitoes.
Tulips (Tulipa species)
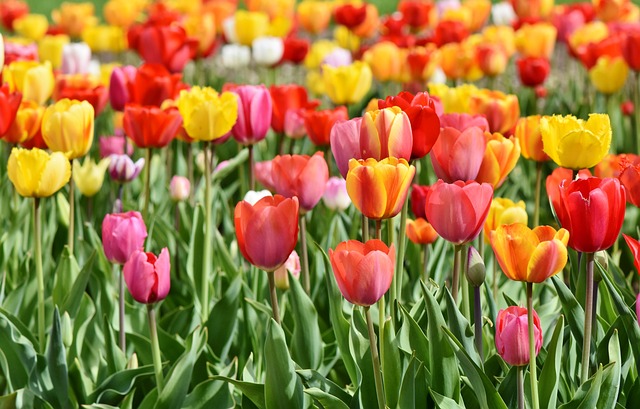
Tulips Care
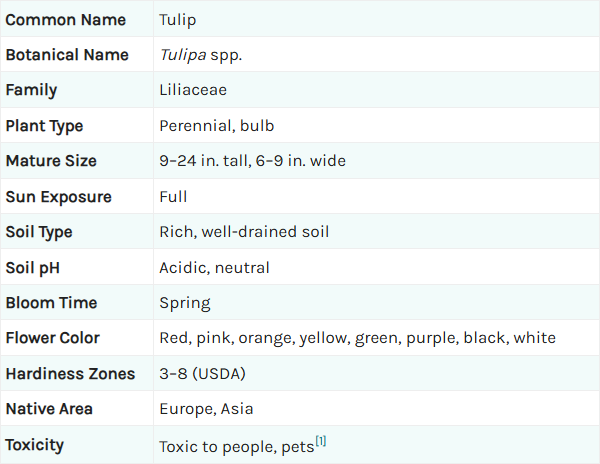
Tulips (Tulipa species) are stunning spring-blooming flowers that come in a wide range of colors and shapes. With proper care, these iconic flowers can thrive in gardens, pots, or even indoors. Here's how to grow and maintain healthy tulip plants:
1. Light:
• Tulips prefer full sun (6–8 hours daily) but can tolerate partial shade.
• In warmer climates, a spot with morning sun and afternoon shade helps prolong blooming.
2. Soil:
• Use well-draining soil with a neutral to slightly acidic pH (6.0–7.0).
• Avoid overly wet or clay-heavy soils, as tulip bulbs are prone to rot in soggy conditions.
• If necessary, amend the soil with sand or compost to improve drainage.
3. Watering:
• Water tulip bulbs after planting to help them establish roots.
• Once established, tulips need moderate watering; the soil should remain slightly moist but never soggy.
• Reduce watering after blooms fade, as the bulbs enter dormancy.
4. Planting Bulbs:
• Plant tulip bulbs in fall, 6–8 weeks before the first hard frost.
• Place bulbs 4–6 inches deep, with the pointed end facing up, and space them about 4–6 inches apart.
• In warmer climates, chill the bulbs in the refrigerator for 6–8 weeks before planting to mimic cold winter conditions.
5. Fertilizer:
• Mix a slow-release bulb fertilizer into the soil at planting time.
• In spring, after the shoots emerge, feed with a balanced fertilizer to encourage healthy blooms.
6. Temperature:
• Tulips thrive in cool spring temperatures (40–70°F or 4–21°C).
• Most varieties need a winter chill period to bloom properly.
7. Pruning and Deadheading:
• Remove spent flowers (deadheading) to prevent the plant from putting energy into seed production.
• Allow the foliage to die back naturally (usually 6–8 weeks after blooming) to replenish the bulb for next year. Avoid cutting green leaves too soon.
8. Pests and Diseases:
• Common pests: Aphids, slugs, and rodents (e.g., squirrels and voles). Protect bulbs with wire mesh or natural repellents if rodents are an issue.
• Common diseases: Gray mold (Botrytis) or bulb rot due to excessive moisture. Ensure proper spacing and well-drained soil to reduce risks.
9. Mulching:
• Apply a layer of organic mulch after planting bulbs in fall to insulate them during winter.
• In spring, remove the mulch to allow sunlight to warm the soil.
Growing Tulips in Pots:
• Choose a pot with good drainage and a depth of at least 8 inches.
• Plant bulbs with their pointed tips 2–3 inches below the soil surface.
• Water sparingly to keep the soil moist but not soggy.
• Place the pot in a cool location until shoots appear, then move it to a sunny spot.
Tulip Blooming Tips:
• For longer-lasting blooms, keep tulips cool and avoid exposing them to excessive heat.
• Mix early, mid-season, and late-blooming varieties for continuous flowering throughout spring.
Aftercare for Tulips:
• In colder regions, leave bulbs in the ground for the following year, but ensure the soil doesn’t stay overly wet.
• In warmer climates, dig up the bulbs after the foliage dies back, store them in a cool, dry place, and replant in fall.
Daisies
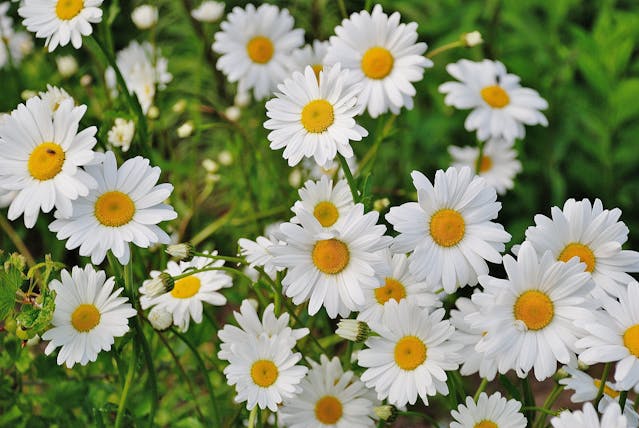
Daisies Care
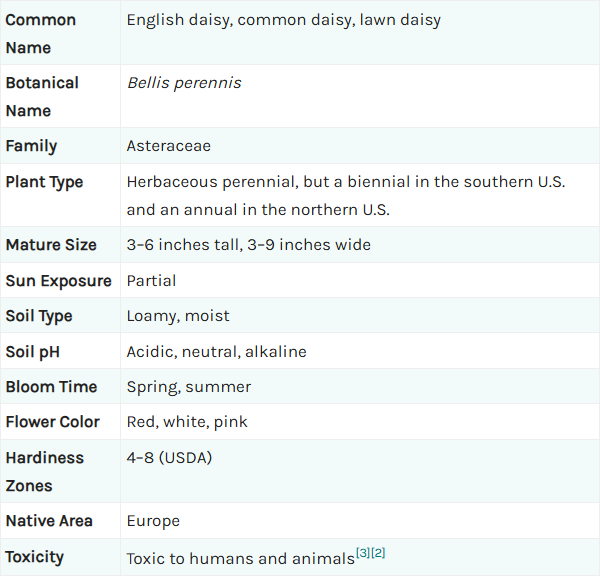
Daisies are cheerful and versatile flowers that symbolize purity and innocence. They are easy to care for and brighten up any garden or indoor space. Popular types include Shasta daisies (Leucanthemum × superbum), Gerbera daisies (Gerbera jamesonii), and common daisies (Bellis perennis). Here’s how to care for them:
1. Light:
• Most daisies prefer full sun, requiring at least 6 hours of direct sunlight daily for optimal blooming.
• Gerbera daisies can tolerate partial shade in hot climates, especially during the afternoon.
2. Soil:
• Daisies thrive in well-draining soil rich in organic matter.
• A slightly acidic to neutral pH (6.0–7.0) is ideal.
• For potted daisies, use a general-purpose potting mix with good drainage.
3. Watering:
• Water regularly to keep the soil evenly moist but not soggy. Allow the top inch of soil to dry out between waterings.
• Overwatering can lead to root rot, while underwatering may cause wilting or fewer blooms.
• Gerbera daisies are particularly sensitive to overwatering, so water at the base to avoid wet leaves.
4. Fertilizer:
• Apply a balanced, slow-release fertilizer during the growing season (spring and summer).
• Use a bloom-boosting fertilizer (low nitrogen, higher phosphorus) to encourage more flowers.
• Avoid over-fertilizing, as it can lead to excessive foliage and fewer blooms.
5. Pruning and Deadheading:
• Regularly deadhead spent blooms to encourage continuous flowering and prevent the plant from going to seed.
• Trim back any yellowing or damaged leaves to keep the plant looking tidy.
• For perennials like Shasta daisies, cut back the plant to a few inches above the ground after the blooming season ends.
6. Temperature:
• Most daisies prefer moderate temperatures, thriving in 60–75°F (15–24°C).
• Protect from extreme heat, which can stress the plant, and from frost, which can damage or kill tender varieties.
7. Humidity:
• Daisies are adaptable to various humidity levels but prefer a moderate environment.
• Ensure good air circulation to prevent fungal diseases, especially in humid climates.
8. Mulching:
• Apply a layer of organic mulch around the base of the plant to retain soil moisture, regulate temperature, and suppress weeds.
• Keep mulch away from the crown to prevent rot.
9. Propagation:
• Daisies can be propagated through seeds, division, or cuttings.
• Divide perennial daisies (e.g., Shasta daisies) every 2–3 years in early spring or fall to rejuvenate the plant and prevent overcrowding.
Common Problems and Solutions:
• Wilting or Drooping: Check for underwatering or overwatering and adjust accordingly.
• Yellow Leaves: Could indicate overwatering, nutrient deficiencies, or pest issues.
• Pests: Aphids, spider mites, and whiteflies are common pests. Use neem oil, insecticidal soap, or natural predators like ladybugs to manage infestations.
• Powdery Mildew or Leaf Spot: Ensure good air circulation, avoid overhead watering, and apply fungicides if needed.
Marigold (Tagetes species)
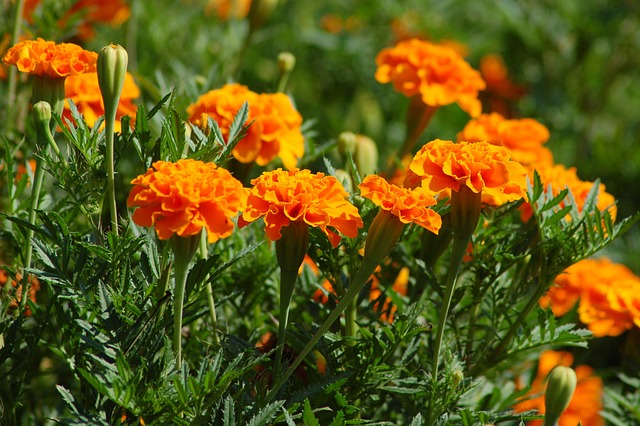
Marigold Care
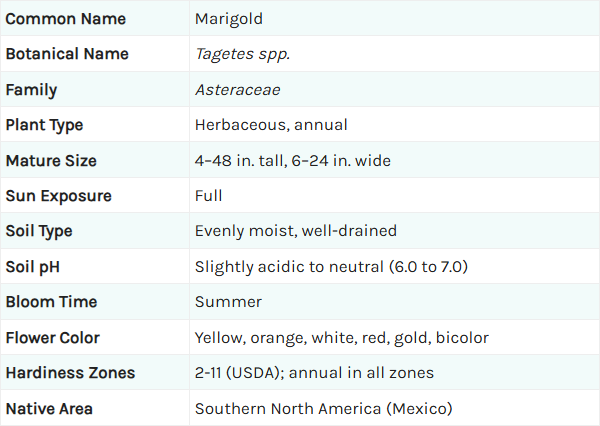
Marigold (Tagetes species) are cheerful, hardy, and easy-to-grow flowers that brighten up gardens and provide pest control benefits. With proper care, they can thrive in various climates and conditions. Here’s how to keep your Marigold flourishing:
1. Light:
• Full sun is essential for vibrant blooms. Marigold need at least 6–8 hours of direct sunlight daily.
• In very hot climates, they can tolerate light afternoon shade.
2. Soil:
• Marigold prefer well-draining soil but are not picky about soil quality.
• A moderately fertile soil with a pH of 6.0–7.0 works best.
• Avoid overly rich soil, as it can lead to excessive foliage and fewer flowers.
3. Watering:
• Water deeply and consistently, but let the soil dry out between waterings.
• Overwatering can lead to root rot and fungal diseases.
• Young plants need more frequent watering, while established Marigold are somewhat drought-tolerant.
4. Fertilizer:
• Fertilize sparingly. Too much fertilizer, especially nitrogen, encourages leaf growth at the expense of blooms.
• A balanced, slow-release fertilizer applied once at planting is usually sufficient.
5. Planting:
• Seeds: Start marigold seeds indoors 4–6 weeks before the last frost or sow directly outdoors after the frost has passed.
• Spacing: Space plants 6–18 inches apart, depending on the variety, to allow good air circulation.
6. Pruning and Deadheading:
• Regularly deadhead spent blooms to encourage continuous flowering.
• Pinch back young plants to encourage bushier growth.
7. Temperature:
• Marigold thrive in warm weather, with an ideal temperature range of 70–85°F (21–29°C).
• They are frost-sensitive, so plant outdoors only after the danger of frost has passed.
8. Pests and Diseases:
• Marigold are generally pest-resistant but may occasionally attract aphids, spider mites, or whiteflies. Treat infestations with neem oil or insecticidal soap.
• They are prone to fungal diseases like powdery mildew in overly humid conditions. Ensure proper spacing and avoid wetting the foliage during watering.
* Growing Marigold in Pots:
• Use a pot with drainage holes and a general-purpose potting mix.
• Choose dwarf or compact varieties for container gardening.
• Water potted Marigold more frequently, as pots dry out faster than garden soil.
* Common Problems and Solutions:
• Yellow Leaves: Likely due to overwatering or poor drainage. Adjust watering habits.
• Few Blooms: Could be caused by too much fertilizer or insufficient sunlight. Reduce feeding and ensure full sun.
• Wilting: Check for underwatering or root rot. Improve drainage if necessary.
Geranium (Pelargonium species)
Geranium Care
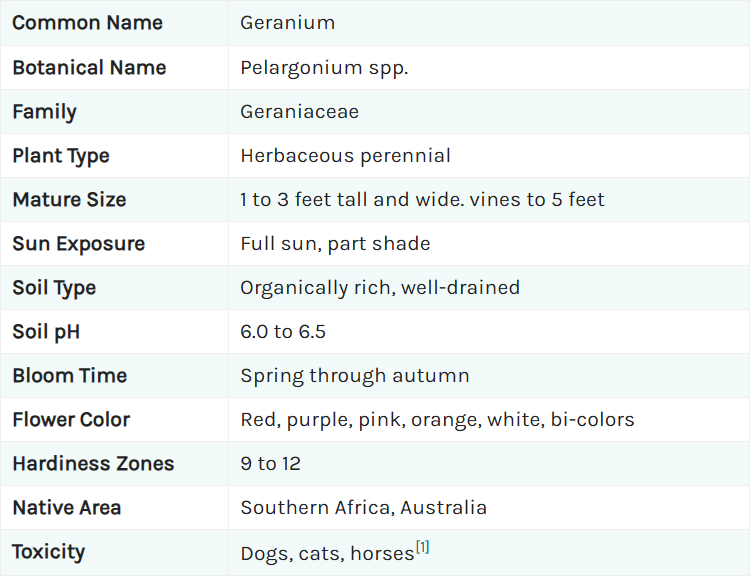
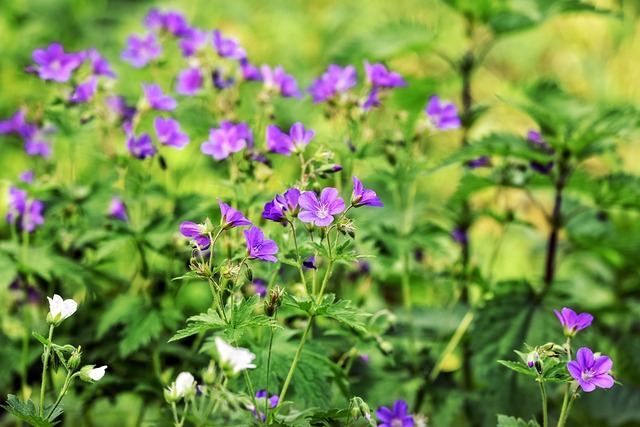
Geranium (Pelargonium species) are vibrant, versatile plants known for their colorful blooms and fragrant foliage. They can thrive as garden plants or in pots, making them a favorite for gardeners worldwide. Here’s how to care for them effectively:
1. Light:
• Full sun to partial shade: Geranium need 4–6 hours of direct sunlight daily for optimal blooming.
• In hot climates, afternoon shade can protect them from intense heat.
2. Soil:
• Prefer well-draining soil that’s moderately fertile.
• A mix of garden soil and potting compost works well. For pots, use a commercial potting mix with good drainage.
• The ideal soil pH is 6.0–7.0 (slightly acidic to neutral).
3. Watering:
• Water Geranium when the top 1–2 inches of soil feel dry.
• Avoid overwatering; soggy soil can lead to root rot.
• During hot weather, potted Geranium may need watering daily, while garden plants require less frequent watering.
4. Fertilizer:
• Feed Geranium with a balanced fertilizer (10-10-10 or 20-20-20) every 4–6 weeks during the growing season.
• Avoid over-fertilizing, which can lead to more foliage and fewer flowers.
5. Pruning and Deadheading:
• Deadhead spent blooms regularly to encourage continuous flowering.
• Prune leggy stems to promote bushier growth.
• At the end of the growing season, trim back stems for overwintering or replanting.
6. Temperature:
• Geranium prefer warm temperatures between 65–75°F (18–24°C) during the day and above 50°F (10°C) at night.
• They are sensitive to frost; bring potted plants indoors or cover garden plants if frost is expected.
7. Humidity:
• Geranium prefer low to moderate humidity.
• Good air circulation helps prevent fungal diseases, especially in humid climates.
8. Pests and Diseases:
• Common Pests: Whiteflies, spider mites, aphids, and mealybugs. Use neem oil or insecticidal soap for treatment.
• Common Diseases: Rust, leaf spot, or root rot. Avoid overhead watering and ensure good drainage to prevent these issues.
9. Overwintering Geranium:
• In colder climates, bring Geranium indoors before the first frost.
• Keep them in a cool, bright location (50–60°F or 10–15°C).
• Reduce watering during winter dormancy and avoid fertilizing.
Planting Tips:
• Spacing: Space plants 6–12 inches apart to allow for proper air circulation.
• Propagation: Geranium can be propagated from seeds, stem cuttings, or division. Stem cuttings taken in late summer or early fall root easily.
* Common Problems and Solutions:
• Yellow Leaves: May indicate overwatering, poor drainage, or nutrient deficiency. Adjust care accordingly.
• No Flowers: Often caused by too much fertilizer, insufficient light, or overwatering. Ensure full sun and proper feeding.
• Wilting or Drooping: Check for root rot, underwatering, or pest infestations.
Zinnias (Zinnias species)
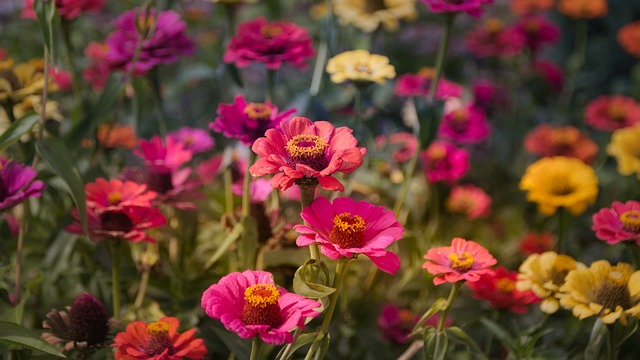
Zinnias Care
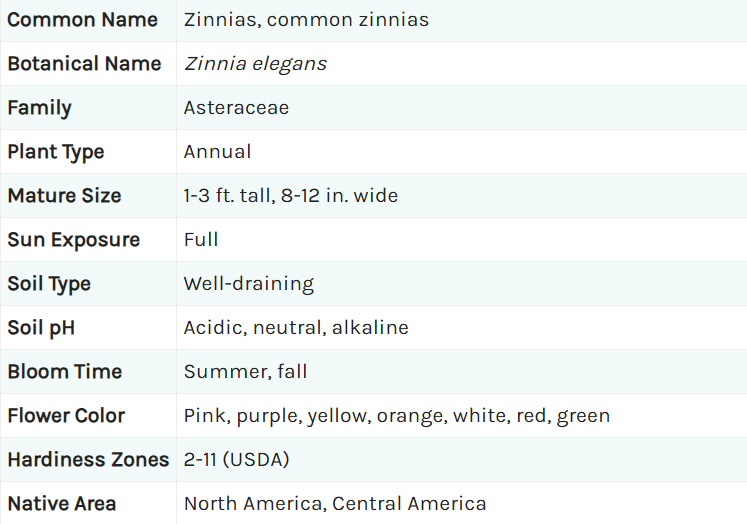
Zinnias (Zinnias species) are vibrant, low-maintenance flowers beloved for their bold colors and long-lasting blooms. They’re excellent for gardens, borders, and cut flowers. Here's how to grow and care for Zinnias successfully:
1. Light:
• Full sun is essential for healthy growth and abundant blooms.
• Zinnias need at least 6–8 hours of direct sunlight daily.
2. Soil:
• Zinnias prefer well-draining, fertile soil with a neutral to slightly acidic pH (6.0–7.5).
• Amend poor soils with compost or organic matter for better drainage and nutrition.
3. Watering:
• Water deeply when the top inch of soil feels dry.
• Avoid wetting the leaves to prevent fungal diseases like powdery mildew.
• Established Zinnias are somewhat drought-tolerant, but consistent moisture promotes better blooms.
4. Fertilizer:
• Use a balanced fertilizer (10-10-10) every 4–6 weeks during the growing season.
• Over-fertilizing can lead to lush foliage with fewer flowers.
5. Spacing and Planting:
• Space Zinnias plants 6–24 inches apart, depending on the variety, to ensure good air circulation.
• Direct sow seeds outdoors after the last frost or start them indoors 4–6 weeks before the frost date.
6. Temperature and Climate:
• Zinnias thrive in warm temperatures, ideally 70–90°F (21–32°C).
• They are frost-sensitive and should be planted only after the risk of frost has passed.
7. Deadheading and Pruning:
• Deadhead spent blooms regularly to encourage continuous flowering.
• For bushier plants, pinch back the tips of young plants to promote branching.
8. Pest and Disease Management:
• Pests: Aphids, spider mites, and whiteflies may target Zinnias. Use neem oil or insecticidal soap for control.
• Diseases: Powdery mildew and leaf spot are common in humid conditions. Ensure proper spacing and avoid overhead watering to minimize risks.
Planting Tips:
1. Seed Planting:
• Sow seeds 1/4 inch deep in moist soil.
• Germination occurs in 5–10 days in warm conditions.
2. Companion Planting:
• Zinnias attract pollinators and beneficial insects, making them great companions for vegetables like tomatoes and cucumbers.
Tips for Cut Flowers:
• Harvest Zinnias when the blooms are fully open for the longest vase life.
• Cut in the morning and place the stems in water immediately.
• Remove lower leaves to prevent rotting in water.
Azalea
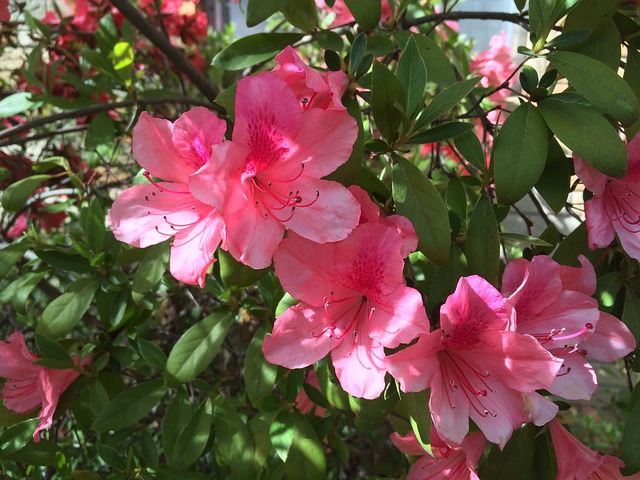
Azalea Care
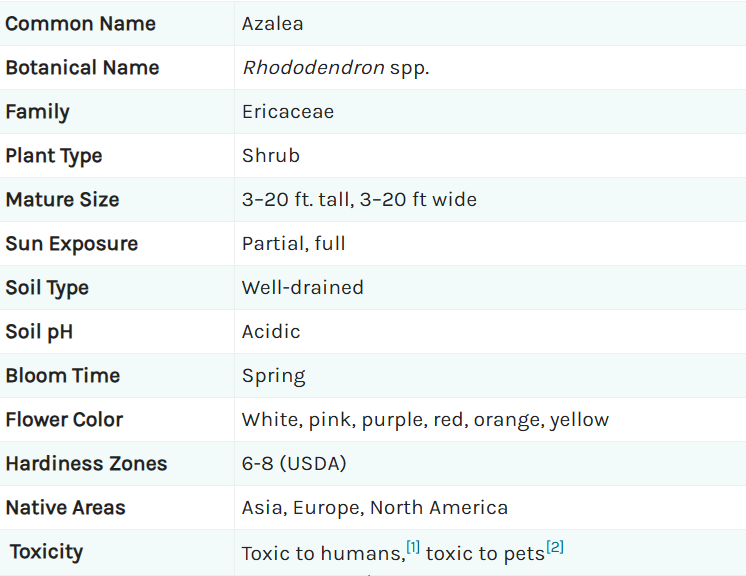
Azalea are stunning flowering shrubs known for their vibrant blooms and evergreen foliage. Proper care ensures their health and enhances their natural beauty. Here's a guide to caring for Azalea:
1. Light Requirements:
• Azalea thrive in filtered light or partial shade, such as under trees.
• Avoid full sun, which can scorch the leaves, or deep shade, which reduces blooming.
• Morning sun with afternoon shade is ideal.
2. Soil:
• Azalea prefer acidic soil with a pH between 4.5 and 6.0.
• The soil should be well-draining, loose, and rich in organic matter.
• Amend heavy clay or sandy soil with compost or peat moss.
3. Watering:
• Keep the soil consistently moist but not soggy.
• Water deeply, ensuring the roots are hydrated without standing water.
• Use mulch to retain moisture and keep roots cool.
4. Mulching:
• Apply a 2–3 inch layer of mulch (pine bark, needles, or shredded leaves) around the base.
• Keep mulch a few inches away from the stems to prevent rot.
5. Fertilizing:
• Fertilize in spring, after flowering, with a fertilizer formulated for acid-loving plants (e.g., azalea or rhododendron fertilizer).
• Avoid over-fertilizing, as it can damage roots and reduce flowering.
6.Pruning:
• Prune Azalea immediately after they finish blooming to shape the plant and remove spent flowers.
• Avoid pruning in late summer or fall, as this can remove next year's flower buds.
• Remove dead, damaged, or crossing branches as needed.
7.Pest and Disease Management:
• Pests: Lace bugs, spider mites, and aphids are common. Treat with neem oil or insecticidal soap.
• Diseases: Root rot, powdery mildew, and petal blight can occur in poor conditions. Ensure proper drainage and good air circulation to prevent these issues.
Tips for Healthy Azalea
• Test Soil pH: Regularly check pH levels to maintain acidic conditions.
• Avoid Overwatering: Azalea dislike soggy soil, which can lead to root rot.
• Location Matters: Plant in sheltered areas to protect from harsh winds.
• Companion Plants: Pair with shade-loving plants like ferns, hostas, or Hydrangea for a complementary look.
Boxwood
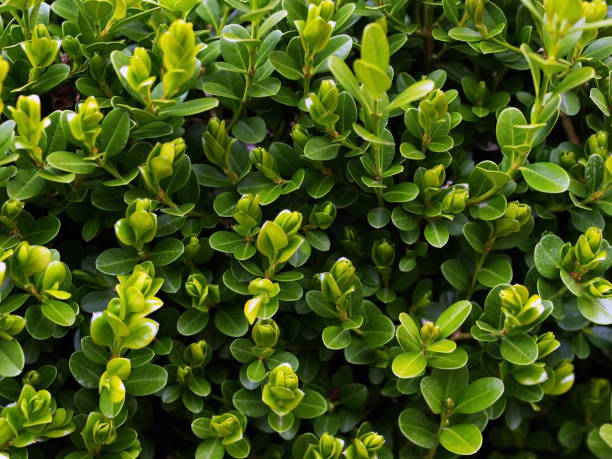
Boxwood Care
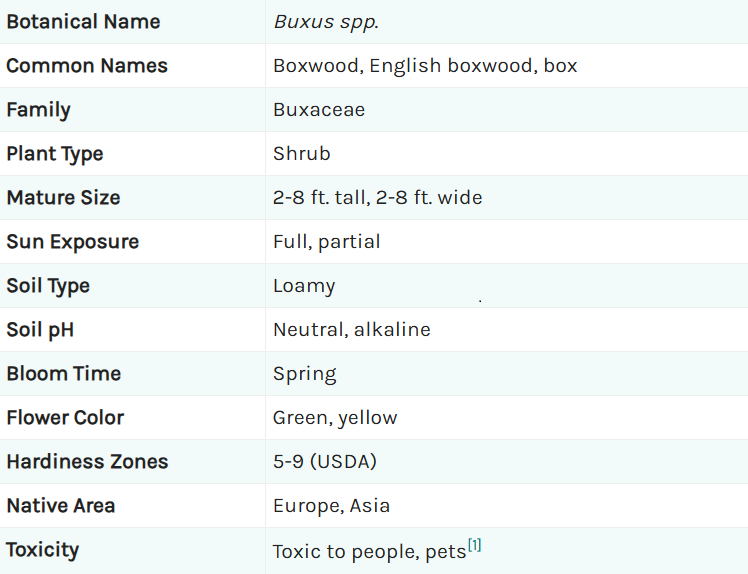
Boxwood are versatile, evergreen shrubs prized for their dense foliage and adaptability in landscapes. Whether used for hedges, borders, or topiaries, Boxwood thrive with proper care. Here's a guide to maintaining healthy Boxwood:
1. Light Requirements:
• Partial shade to full sun works well for most Boxwood.
• Avoid planting in full sun in extremely hot climates, as it can scorch the foliage.
• Protect from harsh winter winds with a sheltered location.
2. Soil:
• Boxwood prefer well-draining soil with a slightly acidic to neutral pH (6.5–7.0).
• Amend heavy or clay soils with organic matter like compost to improve drainage.
• Mulch around the base to maintain consistent soil moisture and temperature.
3.Watering:
• Water deeply but infrequently to encourage deep root growth.
• Keep the soil evenly moist, especially during the first year after planting.
• Established Boxwood are drought-tolerant but benefit from watering during prolonged dry spells.
4. Fertilizing:
• Fertilize in spring with a slow-release, balanced fertilizer.
• Avoid over-fertilizing, as excessive nitrogen can harm the roots and foliage.
5. Pruning:
• Prune Boxwood in late winter or early spring to shape and remove dead or damaged branches.
• Avoid heavy pruning in late summer or fall, as new growth may not harden off before winter.
• For hedges, shear lightly after new growth appears in late spring or early summer.
6. Mulching:
• Apply a 2–3 inch layer of mulch around the base to retain moisture and regulate soil temperature.
• Keep mulch a few inches away from the trunk to prevent rot.
7. Winter Protection:
• Protect Boxwood from winter damage with burlap screens or windbreaks in exposed locations.
• Avoid late-season fertilization to reduce the risk of winter burn.
• Water thoroughly in late fall before the ground freezes to prevent desiccation.
8. Pest and Disease Management:
• Pests: Boxwood leafminers, mites, and scale insects are common. Treat with neem oil or insecticidal soap if needed.
• Diseases: Boxwood blight, root rot, and powdery mildew can occur in poor conditions.
Tips for Healthy Boxwood
• Spacing Matters: Provide adequate space between plants to prevent overcrowding and improve air circulation.
• Avoid Stress: Protect Boxwood from mechanical damage (e.g., lawn mowers) and harsh environmental conditions.
• Mulch and Soil Care: Regularly replenish mulch and monitor soil moisture to support healthy roots.
• Companion Planting: Pair with other evergreens or flowering perennials for aesthetic variety.
Rhododendron

Rhododendron Care

Rhododendrons are beautiful, flowering shrubs prized for their vibrant blooms and lush foliage. They thrive in cool climates and acidic soils. Here's how to care for rhododendrons to ensure they flourish:
1. Light Requirements:
• Prefer partial shade, especially in hot climates.
• Morning sun with afternoon shade is ideal.
• Avoid deep shade, which can reduce flowering.
2. Soil:
• Rhododendrons need well-draining, acidic soil with a pH of 4.5–6.0.
• Soil should be rich in organic matter; amend with peat moss, compost, or leaf mold if needed.
• Avoid planting in heavy clay or overly wet soils to prevent root rot.
3. Watering:
• Keep the soil consistently moist but not soggy.
• Water deeply once or twice a week, especially during dry periods.
• Mulch around the base to retain moisture and regulate soil temperature.
4. Mulching:
• Apply a 2–3 inch layer of mulch (pine needles, bark, or wood chips) around the root zone.
• Keep mulch a few inches away from the trunk to prevent rot.
5. Fertilizing:
• Fertilize in early spring, just before new growth starts, using a fertilizer designed for acid-loving plants (e.g., azalea or rhododendron fertilizer).
• Avoid fertilizing after mid-summer to prevent new growth that could be damaged by frost.
6. Pruning:
• Deadhead spent flowers immediately after blooming to encourage new growth and prevent seed formation.
• Prune lightly after flowering to shape the plant and remove dead or diseased branches.
• Avoid heavy pruning, as rhododendrons bloom on old wood.
7. Winter Protection:
• Protect rhododendrons from harsh winter winds by planting in a sheltered location or using burlap screens.
• Mulch heavily in late fall to insulate roots in colder climates.
• Water thoroughly before the first frost to help the plant withstand winter conditions.
8. Pest and Disease Management:
• Pests: Aphids, lace bugs, and spider mites are common. Treat with neem oil or insecticidal soap.
• Diseases: Root rot, powdery mildew, and leaf spots can occur with poor drainage or overcrowding.
Tips for Healthy Rhododendrons
• Spacing: Plant with adequate space to allow for air circulation and prevent fungal diseases.
• Companion Plants: Pair with other acid-loving plants like azaleas, ferns, or camellias for a cohesive garden design.
• Avoid Overwatering: Rhododendrons are sensitive to waterlogged conditions, so ensure soil drains well.
• Mulch Maintenance: Replenish mulch annually to retain soil moisture and suppress weeds.
Forsythia

Forsythia Care

Forsythia is a hardy, fast-growing shrub known for its bright yellow flowers that herald the arrival of spring. These low-maintenance plants thrive in a variety of conditions, making them popular for hedges, borders, or standalone features. Here's how to care for forsythia:
1. Light Requirements:
• Forsythia thrives in full sun (6+ hours of direct sunlight daily).
• It tolerates partial shade but will produce fewer flowers.
2. Soil:
• Grows well in well-draining soil, but it’s adaptable to most soil types, including clay or sandy soil.
• Prefers slightly acidic to neutral soil (pH 6.0–7.0).
• Add compost or organic matter to enrich the soil if necessary.
3. Watering:
• Water regularly during the first year to help establish the roots.
• Once established, forsythia is drought-tolerant but benefits from occasional watering during extended dry periods.
• Avoid overwatering, as soggy soil can lead to root rot.
4. Fertilizing:
• Forsythia typically doesn’t require much fertilizer.
• Apply a balanced fertilizer (10-10-10) in early spring before new growth starts.
• If the plant appears weak or grows slowly, feed again in mid-summer.
5. Pruning:
• Prune immediately after flowering to maintain its shape and encourage growth.
• Remove about 1/4 to 1/3 of the oldest stems at the base to rejuvenate the plant.
• Avoid pruning in late summer or fall, as this can remove next year’s flower buds.
• Thin out overcrowded branches to improve air circulation.
6. Mulching:
• Apply a 2–3 inch layer of mulch around the base to conserve moisture and suppress weeds.
• Keep mulch a few inches away from the stems to prevent rot.
7. Winter Protection:
• Forsythia is hardy and doesn’t need much winter protection.
• In colder climates, add a layer of mulch to protect the roots from freezing.
• Protect young plants from heavy snow or ice accumulation that can break branches.
8. Pest and Disease Management:
• Forsythia is generally resistant to pests and diseases.
• Ensure good air circulation and avoid waterlogging.
• Watch for aphids or caterpillars; treat with neem oil or insecticidal soap if needed.
Tips for Healthy Forsythia
• Space Wisely: Plant 4–6 feet apart to give forsythia room to grow without overcrowding.
• Encourage Blooming: Ensure plenty of sunlight and avoid heavy pruning in the fall.
• Control Growth: Forsythia grows quickly and can become unruly. Regular pruning keeps it manageable.
• Companion Plants: Pair with spring bulbs (like tulips or daffodils) or early perennials for a vibrant spring display.
Vines and Climbers

Vines and Climbers Care

vines and climbers requires understanding their growth habits and providing the right support. These versatile plants can add vertical interest, shade, and beauty to your garden. Here's a general guide to help you grow healthy and flourishing vines and climbers:
1. Choosing the Right Plant:
• Flowering vines: Clematis, wisteria, jasmine.
• Foliage vines: Ivy, pothos, philodendron.
• Fruit-bearing vines: Grapes, passionfruit, kiwi
• Fast-growers: Morning glory, bougainvillea, or trumpet vine for quick coverage.
2. Light Requirements:
• Sun-loving vines: Most flowering climbers like wisteria, jasmine, and bougainvillea need full sun (6+ hours daily).
• Shade-tolerant vines: English ivy, climbing hydrangea, and philodendron thrive in partial to full shade.
3. Soil:
• Most vines prefer well-draining soil enriched with organic matter.
• Adjust pH as needed based on the plant type (e.g., acid-loving climbers like clematis).
• Amend poor soil with compost or peat moss for better nutrition and aeration.
4. Watering:
• New plants: Keep the soil consistently moist but not waterlogged.
• Established plants: Water deeply once a week, adjusting for weather and soil type.
• Drought-tolerant climbers (e.g., bougainvillea) need less frequent watering.
5. Fertilizing:
• Apply a balanced fertilizer (10-10-10) during the growing season to promote healthy foliage and blooms.
• Flowering vines benefit from phosphorus-rich fertilizers to boost blooms.
• Avoid over-fertilizing, which can lead to excessive leaf growth at the expense of flowers.
6. Pruning:
• Prune regularly to control growth, remove dead or damaged branches, and encourage flowering.
• Timing: Prune after flowering for spring-blooming vines and during dormancy for vigorous growers like wisteria.
• For rampant growers, trim back frequently to prevent overcrowding and invasiveness.
7. Training and Support:
• Install appropriate supports such as trellises, arbors, fences, or walls to guide growth.
• Tie stems gently to supports using garden ties or twine.
• For self-clinging vines like ivy or climbing hydrangea, ensure the structure can handle their weight over time.
8. Mulching:
• Add a 2–3 inch layer of mulch around the base to retain soil moisture and suppress weeds.
• Keep mulch a few inches away from stems to prevent rot.
9. Pest and Disease Management:
• Common issues include aphids, spider mites, and powdery mildew.
• Use neem oil, insecticidal soap, or appropriate fungicides as needed.
• Ensure good air circulation and avoid wetting leaves to prevent fungal diseases.
10. Winter Protection:
• In colder climates, mulch heavily around the roots and cover sensitive vines with burlap or frost cloth.
• Hardy vines like ivy or wisteria may not need extra protection.
Tips for Healthy Vines & Climbers
• Choose the Right Location: Match the plant’s sunlight and soil needs to the planting site.
• Monitor Growth: Train and prune regularly to keep growth manageable and prevent them from overtaking other plants.
• Inspect Supports: Ensure trellises, arbors, or other supports are sturdy enough for mature vines.
• Group Planting: Combine flowering vines with perennials or groundcovers for a layered effect.
Clematis

Clematis Care

Clematis is a stunning flowering vine that adds vertical beauty to any garden with its vibrant blooms. While they are relatively easy to grow, proper care ensures healthy growth and abundant flowering. Here's a comprehensive guide to caring for clematis:
1. Light Requirements:
• Full sun to partial shade: Clematis needs at least 6 hours of sunlight daily to bloom well.
• In hot climates, provide afternoon shade to prevent heat stress.
• Ensure the roots stay cool and shaded, which can be achieved with mulch or by planting groundcovers around the base.
2. Soil:
• Prefers well-draining, rich, and slightly alkaline soil (pH 6.5–7.5).
• Improve poor soil by adding compost or aged manure before planting.
• Clematis dislikes soggy conditions, so avoid waterlogged areas.
3. Watering:
• Keep the soil evenly moist, especially during the first growing season.
• Once established, water deeply once a week, adjusting for weather and soil type.
• Avoid watering overhead; water at the base to prevent fungal diseases.
4. Fertilizing:
• Feed clematis with a balanced fertilizer (10-10-10) or a low-nitrogen fertilizer to encourage blooms.
• Apply fertilizer in early spring, after pruning, and again mid-season for continuous flowering varieties.
5. Mulching:
• Add a 2–3 inch layer of mulch (bark, straw, or compost) around the base to keep roots cool and conserve moisture.
• Replenish mulch annually to maintain root health.
6. Pruning:
• Bloom on old wood. Prune lightly after flowering to shape and remove dead wood.
• Bloom on both old and new wood. Prune in early spring to remove weak or dead growth and lightly shape after the first flush of flowers.
• Bloom on new wood. Cut back all stems to about 12–18 inches above the ground in early spring.
7. Support:
• Provide a trellis, arbor, fence, or pergola for clematis to climb.
• Tie young stems gently to the support with soft ties or garden twine.
• Ensure the structure can handle the weight of mature plants.
8. Pest and Disease Management:
• Pests: Aphids, slugs, and spider mites can occasionally attack clematis.
• Treat with neem oil or insecticidal soap.
• Clematis wilt: Sudden stem collapse caused by fungal infection. Remove affected stems and avoid overhead watering.
• Powdery mildew: Ensure good air circulation and water at the base. Treat with fungicide if necessary.
9. Winter Care:
• In colder climates, mulch heavily around the base to protect roots.
• Group 2 and 3 clematis varieties may die back in winter but will regrow from the base in spring.
Tips for Healthy Clematis Growth
• "Head in the Sun, Feet in the Shade": This golden rule ensures healthy growth. Shade the roots with mulch or low-growing plants while exposing the vines to sunlight.
• Train Regularly: Guide young shoots onto their support to prevent tangling or damage.
• Regular Maintenance: Deadhead spent blooms for continuous flowering (variety-dependent).
• Monitor Growth: Clematis can be vigorous; prune as needed to keep growth controlled and avoid crowding.
Wisteria

Wisteria Care

Wisteria is a stunning, fast-growing vine known for its cascading clusters of fragrant flowers. Although it requires some patience and maintenance, proper care ensures healthy growth and abundant blooms. Here's how to care for wisteria:
1. Light Requirements:
• Wisteria thrives in sunny locations and produces the most flowers in full sunlight.
• It can tolerate partial shade but will flower less abundantly.
2. Soil:
• Prefers well-draining soil that is moderately fertile.
• Grows well in slightly acidic to neutral soil (pH 6.0–7.0).
• Avoid overly rich soil, as this can encourage leafy growth at the expense of flowers.
3. Watering:
• New plants: Keep the soil consistently moist until the plant is established (the first 1–2 years).
• Established plants: Water deeply during dry periods but let the soil dry out slightly between waterings.
• Avoid overwatering, as wisteria can tolerate brief periods of drought once mature.
4. Fertilizing:
• Wisteria doesn’t need heavy feeding. Too much nitrogen encourages foliage growth and reduces flowering.
• Apply a low-nitrogen fertilizer or one high in phosphorus (like 5-10-5) in early spring to promote blooms.
• If flowering is poor, try adding bone meal or superphosphate to the soil.
5. Pruning:
• Summer pruning (July–August): Trim back the long, whippy shoots of the current year’s growth to 6–8 inches long.
• Winter pruning (late winter): Cut these same shoots back further, leaving 2–3 buds per shoot.
6. Training and Support:
• Wisteria is a vigorous climber and needs a strong support system like an arbor, pergola, trellis, or sturdy wall.
• Regularly train new shoots by tying them to the support structure with soft ties or twine.
• Ensure the structure is robust enough to handle the weight of mature wisteria, as it can become very heavy over time.
7. Mulching:
• Add a 2–3 inch layer of organic mulch (bark, straw, or compost) around the base to retain moisture and suppress weeds.
• Keep mulch a few inches away from the trunk to prevent rot.
8. Pest and Disease Management:
• Aphids and scale insects are the most common pests; treat with neem oil or insecticidal soap.
• Borers may attack the stems; remove affected branches and treat with insecticides if needed.
• Wisteria is generally disease-resistant but may experience powdery mildew or leaf spot. Ensure good air circulation and avoid overhead watering.
9. Patience for Blooming:
• Wisteria can take 3–5 years (or longer) to bloom when grown from seed.
• Grafted wisteria or mature plants from nurseries often bloom sooner.
10. Winter Care:
• Wisteria is hardy and doesn’t require special winter protection in most climates.
• In colder regions, mulch around the base to protect roots from freezing.
Tips for Healthy Wisteria Growth
• Right Variety: Choose grafted varieties like Wisteria sinensis (Chinese wisteria) or Wisteria floribunda (Japanese wisteria) for quicker blooming.
• Regular Pruning: Keep wisteria in check to prevent it from becoming invasive or damaging structures.
• Avoid Overfeeding: Fertilize sparingly to balance growth and flowering.
• Monitor Growth: Wisteria grows rapidly and can outcompete nearby plants if not controlled.


